About Managing Users and Groups
You can add users and groups to an application in three ways:
-
Define them manually in System Security. See Creating and Managing Groups and Creating and Managing Users .
-
Load them in a bulk import using an XML load file that contains user and group properties and parameters. We suggest building this file using sample security Excel template provided with the Sample Templates OneStream Solution. See Creating and Managing Users and Creating and Managing Groups.
-
Use APIs. See Managing Users and Groups Using BRApi Functions.
About Managing Users and Groups
By default, only an Administrator can perform the tasks described in the following topics. An Administrator can enable other users to perform these tasks by giving them specific system security roles.
In this topic:
Requirements
To let non-Administrators create and manage users and groups, grant them the required security roles. This involves assigning the group to which non- Administrator belongs, to the required roles.
-
Click System > Security > System Security Roles.
-
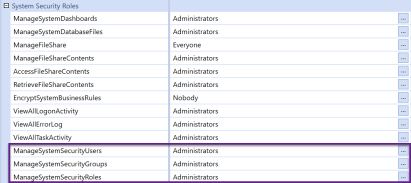
Click Edit by these roles to assign the group in which the user is a member:
-
ManageSystemSecurityUsers: Assignees can create, modify and mange users.
-
ManageSystemSecurityGroups: Assignees can define, modify and mange groups.
-
ManageSystemSecurityRoles: Assignees can manage roles to provide group-based, functionally-tailored access to artifacts and tools.
-
To revoke the ability to manage users, groups and roles, remove assignees from the relevant role. See Manage System Security.
Tips and Best Practices
-
The Administrator is assigned to all system security roles (roles) so can always manage application and system-wide users, groups, artifacts, data, and tools. Removing or reassigning the Administrator group or assigning other users and groups to roles does not revoke the Administrator's access.
-
The Administrator cannot be disabled and is unaffected by inactivity thresholds that disable users who try to log in after a specific period of time elapses.
About Managing Users and Groups › Creating and Managing Users
-
Click System > Security > Users.
-
Click Create User.
-
Enter a name and description.
-
From User Type, select the license type purchased that governs the user's access to artifacts and associated OneStream offerings:
-
Interactive: They can use all features and tools.
-
View:They can access data, reports, and dashboards in a production environment and associated database, but cannot load, calculate, consolidate, certify, or change data.
-
Restricted:They cannot use some OneStream Solution features such as Lease, Account Reconciliation and more due to contractual limitations.
-
Third Party Access:They can access applications with a third-party application by logging in using a named account. They cannot change data, modify artifacts or access the Windows application or a browser-based application.
-
Financial Close: They can use Account Reconciliation and Transaction Matching OneStream Solutions.
-
-
Set Is Enabled to True to activate the user. Select Falseto deactivate the user.
-
The information in Status will reflect the user's activity, such as their latest login. Inactivity Threshold displays the number of days a user can remain active in the system without logging in. The user receives an error if they try to log in after the specified number of days elapses. See Creating Users.
-
Read About User Authentication, then Specify Authentication Settings.
About User Authentication
You can add and authenticate users as:
-
Native users that are managed locally in OneStream.
-
External users referenced by an external identity provider (IdP).
Specify Authentication Settings
-
From External Authentication Provider, indicate how to authenticate the user:
-
To use native authentication: Select Not Used and enter the user's password in Internal Provider Password. The first time the user logs in, they can change their password.
-
To use external authentication:
-
Select the appropriate external IdP from External Authentication Provider.
-
In External Provider User Name, enter the user name in the IdP. For example, if a user's name in Azure AD (Microsoft Entra ID) is [email protected], enter [email protected]. This name must be unique and match the user name in the IdP.
-
-
Specify Preferences and Group Membership
-
In Email enter the email address with which the user can receive alerts and messages, such as those generated with business rules.
-
In Culture select the user's locale. Supported locals and languages are specified during OneStream server configuration. See International Settings.
-
In Grid Rows Per Page specify how many rows to display on grids before a page break. Consider the rate of connectivity and screen resolution.
-
Use Custom Text to personalize aspects of functionality given the user's responsibilities. For example, you could define a text field to:
-
Act as a metadata tag, limiting who the user can email.
-
Filter a distribution list or to provide text and images for the user's default workflow profile.
-
Launch a functionally-tailored view of the user’s workspace, such as reporting for controller or executive.
See "Text 1-8" in Entity Dimension.
-
-
In Group Membership, click Add Groupsto include the user in the groups that provide access to the features and tools that the user needs.
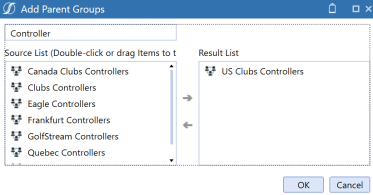
If the appropriate group does not exist, define it. See Creating and Managing Groups. -
Click OK, Save and then Load.
When processing finishes, review the user list and user settings to ensure the loaded users are correctly defined.
About Managing Users and Groups › Creating and Managing Users
Perform the following tasks to edit, copy, delete and perform other management tasks. You can also manage users with API functions.
-
Ensure that you have the necessary security role. See Managing Users.
-
Click System > Security > Users.
-
Select a user, then the action to take. For example:
-
Delete Selected Item: Permanently delete the user.
-
Copy Selected Item: Create a new user based on the selected user's settings. See Copying Users.
-
Show all parent groups for user: See the groups in which the user is a member. Since group assignment to system security roles and user interface roles determines what a user can do, use this option to identify their access to artifacts.
-
-
Click Save.
Copying Users
-
Click System > Security > Users.
-
Select the user, then click Copy Selected Item.
-
In New Name, enter a user name.
-
Select Copy References made by parent groups to add the user to the original user's groups except exclusion groups.
-
Click OK and modify other settings as needed. See Managing Users.
-
Click Save.
Disabling Users
Administrators can disable users, preventing them from logging in by:
-
Modifying a user's account to set Is Enabled to False. See Disabling a User Manually.
- Specifying an inactivity threshold to deactivate all users - native and external - that try to log in after a particular amount of time elapses. This threshold applies to users in the Administrator group, but not the Administrator. Users that try to log in after the threshold expires receive an error. See Defining an Inactivity Threshold.
Disabling a User Manually
-
Click System > Security.
-
Expand Users and select the user to disable.
-
From Is Enabled, select False.
-
Click Save.
Defining an Inactivity Threshold
-
Launch the Server Configuration Utility.
-
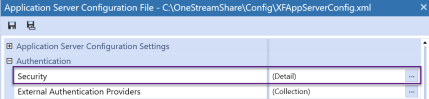
Select File > Open Application Server Configuration File and browse to: OneStreamShare\Config\XSFAppServerConfig.xml.
-
In Authentication, click Security.
-
In Logon Inactivity Threshold, enter the number of days after which inactive users who try to log in, receive an error.
-
Click OK then Save.
-
In a command prompt, reset IIS.
-
In the application, select System > Security > Users.
-
Select a user and review their Logon Inactivity Threshold.
Enabling Users
-
Select System > Security.
-
Expand Users and select the user.
-
In General, set Is Enabled to True.
-
Click Save.
Removing Users From Groups
Because group membership determines access to artifacts and tools, be sure that you want to remove a user from a group.
-
Select System > Security.
-
Expand Users then click the user.
-
In Group Membership, select the group and click Remove Selected Item.
-
Click Save.
Managing Users With BRApi
You can perform some user and group management tasks using BRApi functions such as CopyUser, DeleteUser, and CopyGroup. The ability to use these functions is governed by your role as an Administrator and may require a Manage System Security role. See Manage System Security.
For example, if a dashboard's design includes a button that uses a BRApi function to support adding users, users that click the button are validated to ensure they are in the Administrator group or associated with the ManageSystemSecurityUsers role.
About Managing Users and Groups › Creating and Managing Users
You can bulk load user accounts, groups, and security instead of defining them manually. You can load these artifacts in two ways:
-
Use the SecurityTemplate.xlsx file provided by the SampleTemplates OneStream Solution to generate an xml load file. We recommend this option. See the OneStream Sample Templates User Guide.
-
Extract users in the sample GolfStream application, modify the xml export file to specify user and group properties, and then load the file. See Loading Users.
Administrators must load users and groups into a new application or one without existing users and groups. If user accounts exist, loaded users are validated by comparing their current security settings to those in the xml load file.
Requirements
By default, only Administrators can load and extract users. To let other users load and extract users, grant them these system security roles:
-
SystemLoadandExtractPage System. This is a User Interface role.
-
ManageSystemSecurityUsers
-
ManageSystemSecurityGroups
-
ManageSystemSecurityRoles
Loading Users
-
Click System > Tools > Load/Extract.
-
Select Load and browse to an xml load file.
-
Click Load.
-
When processing finishes, review the user list and user settings to ensure the loaded users are correctly defined.
Extracting Users
You can extract users, groups, and security roles to an xml export file.
-
Click System > Tools > Load/Extract.
-
Click Extract then select File Type > Security.
-
In Items to Extract, select Users. Select Export Unique IDs to also extract each user's ID.
- Perform a task:
- Click Extract to specify where to save the extract file.
- Click Extract and Edit to view and modify the data in an XML Editor.
- Click Extract to specify where to save the extract file.
About Managing Users and Groups
By default, only an Administrator can perform the tasks described in the following topics. An Administrator can enable other users to perform these tasks by assigning specific system security roles. See Requirements.
In this topic:
Requirements
To let non-Administrators create and manage users and groups, grant them group-based access to the required security roles.
-
Click System > Security > System Security Roles.
-
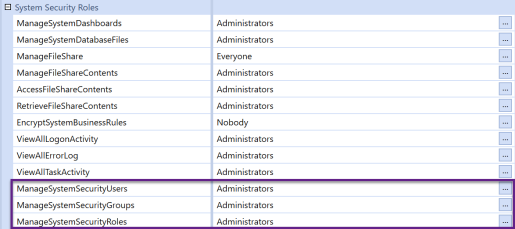
Click Edit by these roles to assign the group in which the user is a member:
-
ManageSystemSecurityUsers: Assignees can create, modify and mange users.
-
ManageSystemSecurityGroups: Assignees can define, modify and mange groups.
-
ManageSystemSecurityRoles: Assignees can manage roles to provide group-based, functionally-tailored access to artifacts and tools.
-
To revoke the ability to manage users, groups and roles, remove assignees from the relevant role. See Manage System Security.
About Groups and Inherited Security
You cannot assign individual users access to tools and artifacts. System security roles (roles) to which you assign groups determine this access. Create groups to grant large numbers of users or other groups the functionally-tailored access that they require.
You can define nested, hierarchical groups to best suit your organizational entities, workflows and reporting structures. Nested groups contain lower-level child groups. In this case, child groups - and the users that they contain - inherit the access defined for the parent group.
NOTE: Groups cannot be externally authenticated.
About Exclusion Groups
Use exclusion groups to grant almost everyone - except a particular group or a small number of users - access to a tool or artifact. For example, if everyone but Jim Fey and Lee Diaz must create dashboards, define an exclusion group in which Jim and Lee are members set to "Deny Access". All other members are set to "Allow Access". To easily grant access to dashboards, assign the exclusion to which gives everyone access except Lee and Jim access.
Because groups providing access to data and artifacts may contain many groups, removing just a few users - to reflect a corporate reorganization for example, from the group hierarchy can be time consuming. To handle the reorganization, create an exclusion group with the users involved and apply it to the roles they no longer need.
Tips and Best Practices
-
The Administrator is assigned to all roles, so they can always manage artifacts, data and tools. Assigning other groups to security roles does not revoke the Administrator's access.
-
Child groups, nested in higher-level parent groups, can access the tools and artifact that the parent group can, given the parent group's assignment to system security roles (roles). This access is inherited in group hierarchies, from a parent level downward to child groups.
-
Removing child groups from parent groups revokes access to the tools and artifacts that the parent group provides, based on its assignments to roles.
-
In an exclusion group, access to artifacts is determined based on the exclusion order you specify, regardless of a user's membership in a group. To ensure that users who are in several groups can not access artifacts but everyone else can, put:
-
The groups to which the users belong at the top, set to "Allow Access".
-
The individual users below the groups and set the users to "Deny Access".
-
About Managing Users and Groups › Creating and Managing Groups
-
If you are not an Administrator, be sure you meet the Creating Groups.
-
Click System > Security.
-
Click Groups then Create Group.
-
Enter an intuitive name and description.
-
In Group Membership specify the users or child groups to add to the group you are defining, or select a parent group to which to add your new group. Perform any task:
-
To include users and groups in the new group, click Add User | Add Child Group and selecting the user or group. Members can access the artifacts and tools for each system security role to which the group is assigned.
-
To revoke group membership, select users and groups and click Remove.This revokes their access to the tools and artifacts group membership provides based on role assignments.
-
To nest the group in a parent group, click Add Groups in Parent Groups That Contain This Group and select a higher level group. Members in this parent group inherit it's access and permissions based on role assignments.
-
Click Save.
Creating Exclusion Groups
Define an exclusion group to grant almost everyone - except a particular group or a small number of users - group access to a tool or artifact.
-
Click System > Administration > Security.
-
Click Groups then Create Exclusion Group.
-
Enter an intuitive name and description that indicates who is being restricted by this group. For example, to omit a department, consider Everyone-But-<Department name>.
-
In Group Membership click Add Child Groups or Add Users to specify who to include in the group.
-
To prevent members accessing artifacts to which the group has role-based access, set particular users or groups to Deny Access. Otherwise, set members to Allow Access.
-
Use the arrows to order the exclusions carefully, because access is granted - regardless of a user's membership in a group, based on the order you specify.
For example, if Amelia and Bob are in the Frankfurt Controller group, the order below does not restrict them from artifacts, even though they are listed first, because they are in the Frankfurt Controller group.
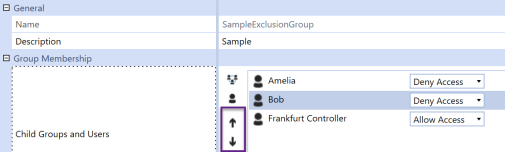
To ensure Amelia and Bob can not access artifacts, put Frankfurt Controller first, set to Allow Access. Put Amelia and Bob below the group, set to Deny Access.
-
Click Save.
About Managing Users and Groups › Creating and Managing Groups
-
If you are not an Administrator, meet the Managing Groups.
-
Click System > Security.
-
Select Groups or Exclusion Groups , then select a group.
-
Click to perform any task:
-
Delete Selected Item: Permanently delete a group.
-
Rename Selected Item: Change a group's name.
-
Copy Selected Item: Create a group based on the existing group's settings. Select Copy child user and group references to add the same users or groups to the new group.
-
Show All Users: View the users in the group.
-
Show All Groups: View the lower level groups that are nested in the group.
-
-
In Group Membership, change who is in the current group and modify the parent groups associated with the current group. Perform any task:
-
To withdraw users and groups, select them and click Remove. This revokes their access to artifacts and tools based on the system security roles (roles) to which the group is assigned.
-
To add users and groups, click Add User | Add Child Group. This grants them access to the artifacts and tools the group provides based on it's role assignments.
-
To withdraw the current group from a parent group, select the parent and click Remove. This revokes access to the artifacts and tools provided by the parent group based on it's role assignments.
-
To include the current group in another parent group, click Add Groups and select the group.
Managing Group Membership
You can add groups and users to, and remove them from, other groups. This may created a hierarchy or impact system security role-based access to artifacts and tools. See Managing Groups.
1. Click System > Security.
2. Expand Groups and select the group.
3. In Group Membership, perform any task:
-
To include a user or group, click Add User or Add Group and select the user or group to add.
-
To withdraw the current group from a parent group, select the parent and click Remove. This revokes access to the artifacts and tools provided by the parent group based on it's role assignments.
-
To include the current group in a parent group, click Add Groups and select the group.
-
About Managing Users and Groups › Creating and Managing Groups
You can bulk load groups, users and security roles instead of defining them manually. You can load groups in two ways:
-
Use the SecurityTemplate.xlsx file provided by the SampleTemplates OneStream Solution to generate an xml load file. We recommend this option. See the OneStream Sample Templates User Guide.
-
Extract the groups in the sample GolfStream application, modify the xml export file to specify your group properties, and then load the file. See Loading Groups.
Administrators must perform the load for a new or empty application that does not contain users or groups. To enable other users to load and extract groups, assign them the necessary security roles. See Creating and Managing Users .
Requirements
To enable other users to load and extract groups, Administrators must assign the group in which these users are members, access to these roles:
-
SystemLoadandExtractPage (user interface role).
-
ManageSystemSecurityGroups
-
ManageSystemSecurityUsers
-
ManageSystemSecurityRoles
Loading Groups
-
If you are not an Administrator, see Requirements.
-
Click System > Tools > Load/Extract.
-
Select Load and browse to an XML load file.
-
Click Load.
-
When processing finishes, review the Groups list and individual group settings to ensure the loaded groups are correctly defined.
Extracting Groups
-
If you are not an Administrator, see Requirements.
-
Click System > Tools > Load/Extract.
-
Click Extract then select File Type > Security.
-
In Items to Extract, select Security Groups.
- Perform a task:
- Click Extract to specify where to save the extract file.
Click Extract and Edit to modify the extracted data in an XML Editor.