This section describes the four-pronged approach to managing security, which consists of:
-
Workflow security
-
Entity security
-
Account security
-
Security roles
Security can be implemented on accounts or dimensions allowing you to control who can review specific dimension members. Security is determined through users and groups, with users given specific roles to determine what data can be accessed or edited.
Implementing Security
A four-prong approach to application security consists of:
-
Workflow security
-
Entity security
-
Account security
-
Security roles
Once you identify entities and assign them to workflow profiles, data loaders and certifiers can be determined for each entity. Data loaders load data into the system, therefore they need read/write access to entities. Data certifiers review and sign off on the loaded data, so they need read access to entities. Security can also be done on the account or any other dimension to control who can review specific dimension members.
Security is determined through users and groups. Users are given specific roles to determine what data is accessed or edited. For example, if a user is given the ModifyData role in an application, he/she will have write-access to any data in it. Users are also put into security groups. Groups can support native groups, exclusion groups, or groups of groups. For example, a user can be put into an entity’s read/write data group for read/write access to the entity’s data.
Every object has access and maintenance security rights, with the exception of Task Scheduler. Access allows the security group to view the object, while maintenance allows the groups to edit the definition of the object. This system applies to most objects, such as cube views, dashboards, transformation rules, and workflow profiles.
Implementing Security › Application Security
Object Security
There needs to be different levels of access for object types and groups of objects, such as Cube Views, Dashboards or Business Rules. Application and System Roles can be granted to User Groups which create subject area administrators and by giving certain rights to a group, such as ManageCubeViews, pseudo administrators are created for these actions. This provides the most power for a specific object type.
A Maintenance Group is the middle level of power for an object at the group level. For example, a Maintenance Group assigned to a specific Entity Transformation Rule Group allows the assigned users to create, edit, and delete rules within that Transformation Rule Group.
An Access Group is the lowest level of power for an object at the group level. This means the object can be used, but its definition cannot be edited.
Confirmation Rules
Confirmation Rule Groups are assigned to Confirmation Rule Profiles which are then assigned to Workflow Profiles. The run time access to these Confirmation Rules depends on to which Workflow Profile they have been assigned. If a user has Workflow Execution Access, he/she will be able to execute them.
The best way to control Confirmation Rules is to set Access to Everyone and Maintenance to Administrators for both Confirmation Rule Groups and Profiles.
Certification Questions
Certification Question Groups are assigned to Certification Question Profiles which are then assigned to Workflow Profiles. The run time access to these Certification Questions depends on to which Workflow Profile they have been assigned. If users have Workflow Execution Access, they will be able to execute them.
The best way to control Certification Questions is to set Access to Everyone and Maintenance to Administrators for both Certification Question Groups and Profiles.
Data Sources
Data Sources are assigned to Workflow Profiles. The run time access to these Data Sources depends on to which Workflow Profile they have been assigned. If a user has Workflow Execution Access, he/she will be able to execute them.
The best way to control Data Sources is to have to the ManageDataSources Application role, and no security settings at the object level.
Transformation Rules
Transformation Rule Groups are assigned to Transformation Rule Profiles which are then assigned to Workflow Profiles. In this case, an appropriate user group needs to be assigned to Access and Maintenance because users will be able to right-click on an Import Workflow Profile and view/edit their Transformation Rules. The user groups should include the users assigned to execute the Workflow Profiles to which the Transformation Rule Profile has been assigned.
The best way to control Transformation Rules is to set Access to Everyone and Maintenance to Administrators for most core, shared, or corporate Transformation Rule Groups For some specific Transformation Rule Groups, such as an Account Transformation Rule Group that applies to a specific location, assign the appropriate user groups to Access and Maintenance. Block access to the Maintenance screen for anyone except administrators because this could potentially allow users more access than they need.
Form and Journal Templates
Form or Journal Groups are assigned to Form/Journal Profiles which are then assigned to Workflow Profiles. The run time access to these Forms or Journals depends on to which Workflow Profile they have been assigned. If a user has Workflow Execution Access, he/she will be able to execute them.
The best way to control Form and Journal Templates is to set Access to Everyone and Maintenance to Administrators for both Form/Journal Groups and Profiles.
Cube Views
The best way to control Cube View Groups is to set Access to Everyone and Maintenance to Administrators and anyone else building a Cube View. To keep the assignment of Cube View Groups to multiple Cube View Profiles flexible, the Cube View Groups need to remain smaller in size. For Cube View Profiles, set Access to anyone who will need to see these Cube Views in OnePlace, Excel, or assign them to Workflow Profiles, Forms, or Dashboards. Set Maintenance to anyone who needs to change the assignment of the Cube View Groups to Cube View Profiles.
OneStream recommends setting the Can Modify Data, Can Calculate, Can Translate, and Can Consolidate properties to False. This can be pre-set for all new Cube Views by creating an example or Cube View Template which can be copied to create new ones. Some examples of when this will not be needed is if the Cube Views are going to be read by administrators only, the Cube Views will be used as a data entry form or are only going to be visible in a formatted report or chart.
System and Application Dashboards
When assigning Dashboard Groups to Profiles, the Visibility is extremely important. For example, if a user has access to a Dashboard Profile in OnePlace, but not to a certain Dashboard Group in that Profile, the user will not be able see the Dashboards in that group. Also, if a user has access to the Dashboard Groups, but not the Profiles, he/she will not be able to see the Dashboards in OnePlace. If a Cube View is assigned to an Application Dashboard, and the user only has access to the Cube View, he/she will not see the Dashboard. Lastly, if a Dashboard is pointing to an Entity, Scenario, or Cube Data to which the user does not have access, he/she will see one of the following: NoAccess in Data Explorer for the cells the user cannot see, a blank cell in the Data Explorer Report, or No Data Series if he/she is viewing a chart.
The best way to control Dashboard Groups is to set Access to Everyone and Maintenance to Administrators and anyone else building a Dashboard. In order to keep the assignment of Dashboard Groups to multiple Dashboard Profiles flexible, the Dashboard Groups need to remain smaller in size. When assigning Maintenance for Dashboard Profiles, give access to anyone who needs to see the Dashboard in OnePlace, assign it to a Workflow Profile, or change the assignments of Dashboard Groups to Dashboard Profiles.
Use multiple Dashboard Maintenance Units in order to keep them a reasonable size making it easier to manage multiple objects and access. Dashboard Parameters can also be used across all Dashboards and do not need to be copied across all Maintenance Units. Security has no bearing on the use of Parameters.
Workflow Security
Security groups for Workflow Execution, which is the ability to process a Workflow for a specific Workflow Profile, Certification Signoff and the separate ability to Process, Approve and Post Journals, exist for all Workflow Profiles. In certain cases, the user simply needs the Access and Workflow Execution Group Access to run Workflow. For example, the user does not need Access or Maintenance Group access to Data Sources or Transformation Rules in order to run through the Import Workflow.
In some cases, having access to certain objects is necessary along with Workflow Execution Group Membership. The Manage App Role has to do with creating, reading, updating, and deleting Journal and Form Templates (metadata) themselves, not just instances of these objects at run time. It is expected that 90% of Workflow users will not have any of the Application Roles, but their access will be controlled by the Access Group for those Journal/Form Template Groups and Profiles. Workflow users also need Workflow Execution Group access in order to perform import, forms, and journal actions. The user does not have to be in the Manage Application role to create a Journal or enter data in the Form. Workflow security governs access to the forms. If the user is in the ManageJournalTemplates Application Role group, he/she can create any Journal needed for the Workflow Profiles to which they have proper execution access.
Users need to have at least Access Group privileges to the Cube Root Workflow Profile node to edit Workflow Profiles with having the ManageWorkflowProfiles role. Otherwise they will not be able to see any Workflow Profiles under the Cube Root Workflow Profile.
The order to follow when assigning access to Workflow Profiles and data is to first assign Read and Read/Write Groups to the Entities involved. Next, create an Access Group, Data Group, and Approver Group for each Workflow Profile and include the appropriate Entity groups.
Import
First, determine whether the users can load data to the Workflow for the assigned Entities and then determine whether they load both GL (BS and PL) and Supplemental data, or one or the other. Next, decide if the users for the assigned Entities can certify the loaded data as part of the Workflow.
Forms
First, determine whether the users can manually input data into a form and certify it as part of the Workflow for the assigned Entities.
Adjustments
First, determine whether the users can manually input data into a journal and certify it as part of the Workflow for the assigned Entities.
Entity Security
Entity Security controls the overall read/write access to Entity data and controls whether Cube Security should be used. When creating Entity security groups for the Read Data Group and the Read/Write Data Group, the groups should be named in a logical convention such as XXXX_View or XXXX_Mod. The Entity Read/Write Data Group should be designed first because it is needed for data loading in Workflows. The Workflow Execution Security Group should be assigned to all the Entities’ Read/Write Security Group for the Workflow to gain loading access to the Entities.
When setting up View Security Groups for Entities, first consider how users need to view their data whether it is by segment or region. Determine whether it makes more sense to have one Entity View Group per Entity, or to create one Entity View Group per segment and apply one Entity View Security Group to many Entities’ Read Data Group. All the Entities’ View Groups below the Parent must be assigned to the Parent Level Entity View Group in order to gain access to data at the Parent Level Entity and View Entities below it. Try to minimize the amount of View Entity Security Groups where possible.
Implementing Security
You can change the security model to allow who controls viewing or modifying the relationship members in the consolidation dimension.
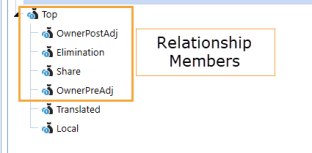
For the Use Parent for Relationship Consolidation dimension Members functionality:
-
If set to False, the user’s entity rights control their rights to all members of the consolidation dimension. This is the default security model.
-
If set to True, the user’s rights to the relationship members of the consolidation dimension are determined by their rights to the current entity’s immediate parent.
Users have either read or read/write access to view or modify their entity so they can see their entire entity from all of the relationship members.
You can allow the relationship security portion of the consolidation dimension to be controlled by the access to the parent entity in the immediate hierarchy.
NOTE: This is strictly a parent and child relationship.
Set this feature to True when:
-
A user’s rights to the non-relationship consolidation dimension members (local and translated) are determined by the user’s rights to the entity itself.
-
A user’s rights to the relationship consolidation dimension members is determined by the user’s rights to the immediate parent entity.
Implementing Security › Relationship Security
-
From the Application tab, under Cube, click Cubes.
-
Select a Cube.
-
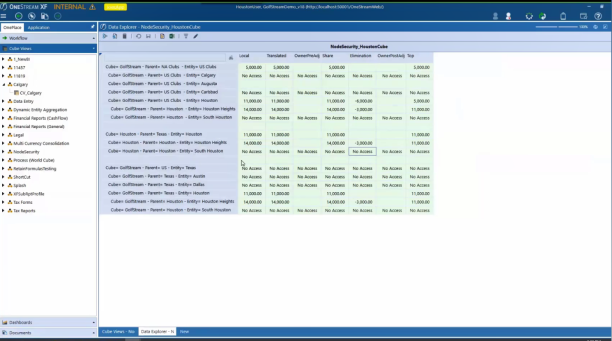
In the Cube Properties tab, in Use Parent Security for Relationship Consolidation Dimension Members, select True.
-
Click Save to save the cube properties. You have now changed the security model for the read or write relationship for the consolidation dimension members to be based on the security rights to the immediate parent entity.
-
Click Refresh to refresh the application.
-
In Cube Views, go to the Designer tab and click Open Data Explorer.
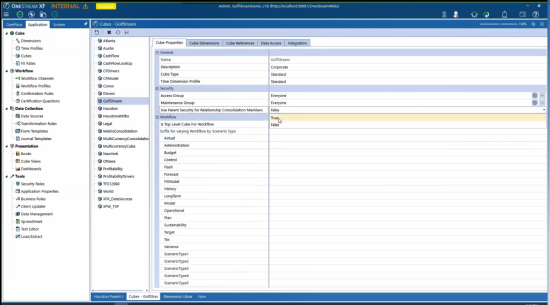
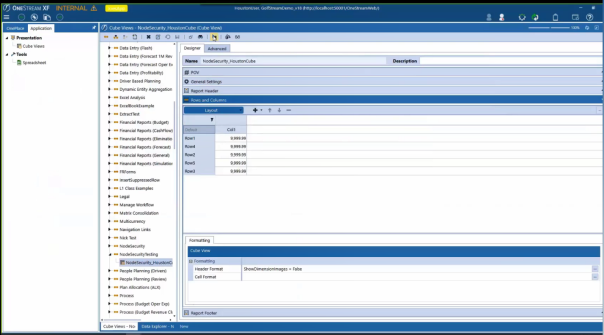
All of the security is changed.
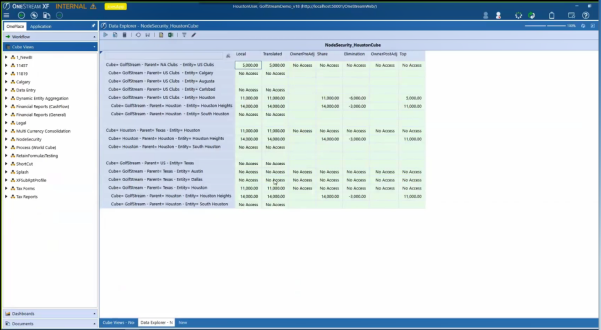
Notice the following changes to security:
-
In the first screenshot, all the consolidation dimension members are available across Houston.
-
When you switch on the new security, in the previous screenshot, the user has rights to USClubs then looking at the Houston member there, all the consolidation dimension members are available.
-
Looking at the last group, the user has no rights to Texas, based on the NoAccess to Local and Translated. In Houston you can see the relationship members changed to NoAccess.
-
The reason why USClubs turns to NoAccess is because the user apparently has no rights to the parent NAClubs, which is not displayed on the report.
Data Security
Data security controls the overall read/write access to analytic models. There are several steps to see if you have access to data. First, it that you have the ModifyData role in the application, otherwise you do not have write access to data. Next, ensures you have either the access group or maintenance group for a cube, or you do not have access to any of the cube’s data. It will then check the scenario and Entity’s Read Data Group and Read Write Data Group to ensure access. Finally checks the Data Cell Access Security at the cube level. If you have access to the data and use Excel or any other method to import data, it ensures the entity being written to belongs to a workflow profile with an active forms channel that is not locked or certified. If any of these steps result in no access, the process stops.
-
There are several ways to guarantee data is secure. Throughout the dimensions, different security groups are available, and an administrator can decide what users belong to each group.
-
The scenario dimension has both Read Data Group and Read and Write Data Group.
-
The entity dimension uses both security groups from the scenario and adds display member group and Use Cube Data Access.
-
The display member group only refers to the member display access level, not the data access level. Use Cube Data Access is used if slice filters are being applied at the cube level to apply additional layers of security for specified security groups.
-
The account, flow, and all user-defined dimensions also use display member group.
At the cube level, more security is put in place through groups, member filters, and complex layered security. A cube slice filters a data entry form to the right member set, such as choosing the cost center in which a user can enter data. For slice filters to take effect, the user must first be granted access to the cube, scenario, and entity. Slice security cannot increase access to data that was not administered first through Users and Groups. An administrator can also lock down more than one dimension by using cube data access and can control user visibility by only giving access to certain accounts. Finally, data cell conditional input and data management access security can be used. These are not security settings but can still control how a dimension can be used for input and how a cube is modified.
Application and System Security
dimensions, cubes, business rules, data management, and File Explorer each have an access and maintenance group. OneStream recommends limiting access to these groups and assigning the screens to administrators. It is also recommended to give the ManageData role to administrators for data management and to give ManageTaskScheduler and TaskScheduler roles in Task Scheduler. The ManageFileShare role should also just be given to administrators. Anyone granted access to a folder in File Explorer has access to every file and folder through OnePlace. For FX rates, limit access by giving administrators the ManageFXRates role and selecting a set of power users.
Implementing Security › Relationship Security
Restrict Users to an Application
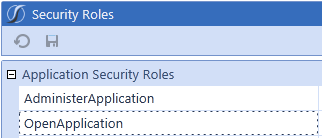
Setting up access to an application can be done within the application security roles. When an application is first created, the OpenApplication defaults to Everyone. If specific people have access to log into OneStream, but only need access to specific applications, then security groups can be assigned to the OpenApplication role. Once the security group is created, users can be assigned to it. This can be done by performing the following steps:
-
Go to System > Administration > Security.
-
Create a new security group.
-
Assign all users who should have access to the application to the new security group.
-
Refresh the application in order for this new security group to appear in all drop down menus.
-
Go to Application > Tools > Security Roles > OpenApplication.
-
Click the drop-down and select the new security group.
-
Click Save.
Restrict Data Input by Origin
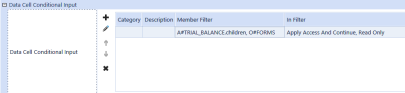
There may be times where data should be loaded through the Import origin but should not be loaded using the Forms origin. This can be handled in the data cell conditional input. For example, users may be able to load trial balance data through the Import origin, but other users submit statistical data through the Forms origin. The data cell conditional input ensures the statistical data does not overwrite the Trial Balance data in Actual. Perform the following steps to do this:
-
Go to Application > Cube > Cubes > Data Access.
-
Go to Data Cell Conditional Input.
-
Click
 to create a new line.
 -
Click
 , or double click on the cell to make changes to the member filter. Add the dimension intersection to restrict data loading. In this case it restricts users from loading to the Trial Balance account through the Forms origin.
 -
In the In Filter field, choose a behavior and choose the Read Only Access level.
Omitting Data Cell Conditional Input by Scenario
Data cell conditional input restricts access to certain intersections or slices of the cube. This behavior might not be desired for all scenarios, time periods or other elements, so this is a simple way to omit these rules for specific elements. The following method is useful when there are many data cell conditional input rules not defined by a scenario at the time of creation. After these rules are created, however, a scenario becomes a factor for historical data.
For example, there may be many read-only intersections in Actual to which users should not load data. These rules are setup in the data cell conditional input section within Application| Cube|Cube|Data Access. However, for historical purposes, there may be data in these intersections that was there prior to the filters being applied. The scenario to which the data is being copied needs to allow access because the historical data in these intersections may need to be copied for analysis.
Create a new data cell conditional input rule for the entire scenario, set the behavior to Increase Access And Stop, set the Access Level to Read Only.
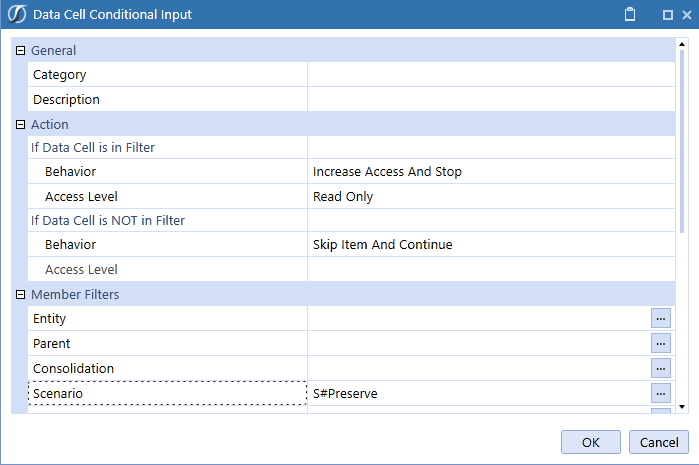
Position this new rule at the top of the Data Cell Conditional Input for the scenario.
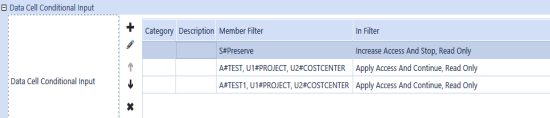
The behavior option Increases Access And Stop is being used because if the current cell matches the filter, access is being increased and all subsequent data access rules are being ignored below. In this case, the Preserve Scenario has access to everything, and the subsequent Data Cell Conditional access rules are ignored or not applied for Preserve.
Implementing Security
System Security applies to the framework. There are some key assumptions around how the different roles or security groups work. First, it is important to understand the hierarchy of certain System Security Roles and Security Groups:
System Security Role
The System Role, such as ManageSystemDashboards, means the user has a higher privilege and does not need to be in any Maintenance Group or Access Group to see, edit, or delete all objects of that type. Having the ManageSystemDashboards System Security Role means the user can create, edit and delete any System Dashboard, System Dashboard Group, or Profile.
Maintenance Group
The Maintenance Group means users cannot only see an object, but can create new objects in Groups, edit, and delete them. Users do not need to be in the Access Group for an object if they are in the Maintenance Group. The Maintenance Group can also control the contents of Profiles.
Access Group
The Access Group means users can see the object and read its contents.
Implementing Security
Management of all changes to the system are recommended to follow best practice procedures. Whether the changes derive from a OneStream software upgrade, or through regular application maintenance, all changes are recommended to be first deployed and tested in a development environment. There are additional benefits of making a recent copy of the production Application database, renaming it and using this as a base for these changes. Search for “Rename Application” in the Installation and Configuration Guide.
Prior to being deployed to a production environment, it is recommended to extract changes from the development environment and assess this deployment of changes in a separate test environment.
Deploying changes to a production environment should avoid times during high load and high application activity. Changes to these types of application artifacts especially should not be performed against a production environment experiencing heavy activity:
-
Business Rules, whether they contain Global functions or not
-
Confirmation Rules
-
Metadata, especially when using member formulas
Applying changes like this while the production system is under a high level of activity may have a negative impact on servers and have the potential to cause running processes to produce an error.
Standard environments are recommended to schedule production changes during slow periods or non-work hours. Large environments should consider using the Pause functionality within the Environment tab to allow activity to wind down. These large environment managers should also consider theOneStream Solution, Process Blocker, which allows a pause of critical processes to perform maintenance on the system, without having to shut down the entire application. Process Blocker allows current tasks to be completed, while any new requests are queued, allowing the changes to be applied safely and effectively. Once these changes are in place, it is recommended to significantly limit the ability for users to make such changes during high volume.
It is key that servers get a chance to recycle for good system memory health. IIS also has an Idle Time-Out setting for our OneStreamAppAppPool. This setting should be set to 0 since OneStream has other settings to recycle IIS. For active, global environments with Data Management Sequences regularly being executed, a recycle of IIS is recommended every 24 hours for these OneStream App Servers. Please discuss this situation with OneStream Support to find what is recommended, as each situation may vary.
Implementing Security
Implementing Security
-
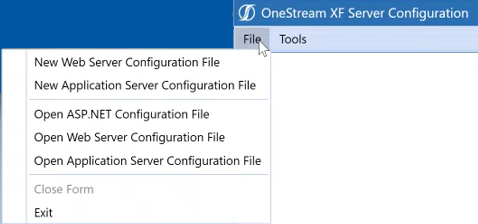
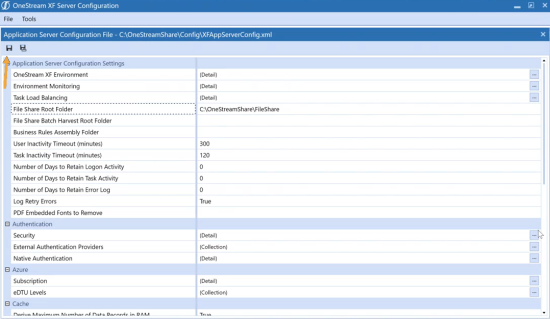
Click File > Open Application Server Configuration File.
-
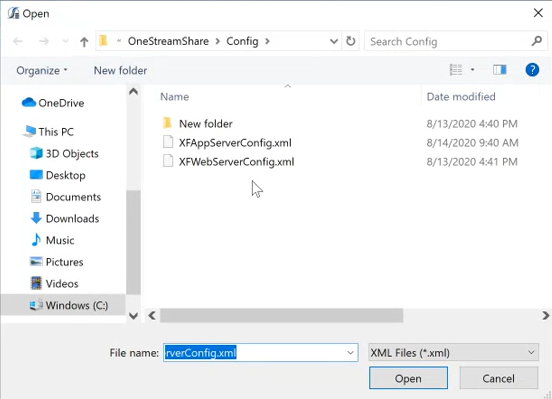
Open the configuration file.
-
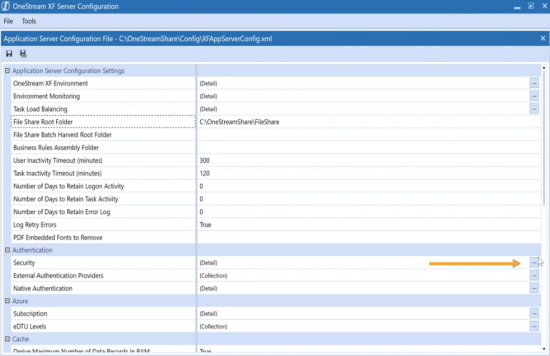
Click Security.
-
Set the Logon Inactivity Threshold (days) to the number of days of inactivity before the user can no longer access the system.
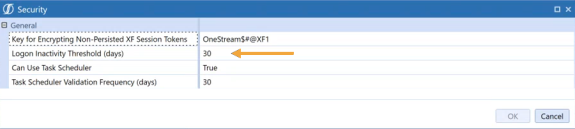
-
Click OK.
-
Click Save.
-
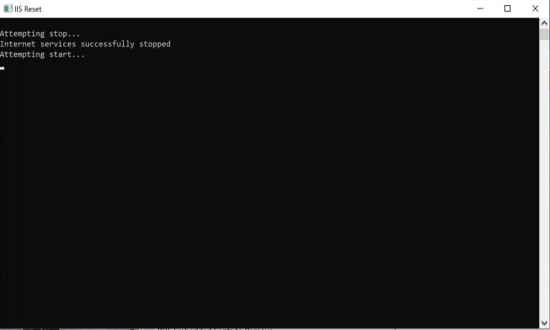
Reset IIS to recognize the changes.
Implementing Security
The Administrator is the only role that the inactivity threshold does not apply.
-
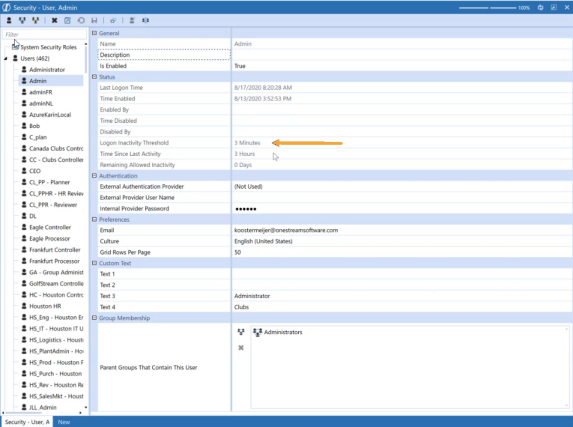
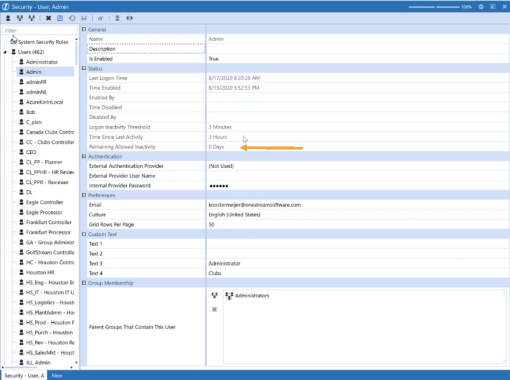
Click System > Security.
-
Click Users to review the threshold setting.
-
If the Remaining Allowed Inactivity is 0 Days, that means the user no longer has access.
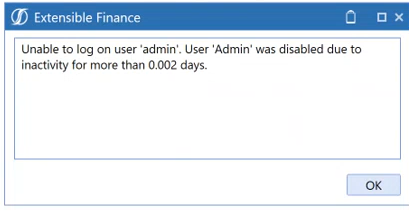
That user gets a message telling them they have been disabled if they log on.
-
To enable their access, click System > Security.

-
Select the user.
-
Click the Is Enabled drop-down.
-
Select True.
-
Click Save.
The Remaining Allowed Inactivity field updates allowing the user to log back in within the time frame specified.
Implementing Security
Implementing Security

Implementing Security
A Business Rule is a VB.Net Class meaning each Business Rule is an independent object encapsulating VB.Net code. A Business Rule can be a one-line call to write a log message, or it can be a full code library containing other custom VB.Net Classes, Methods and Properties.
This section provides a detailed explanation of the following:
-
Platform Engines
-
Business Rule structure and fundamentals
-
Business Rule Classifications
-
Specific Business Rule Types
-
Business Rule organization
-
OneStream Business Rule framework
-
Best practices for Business Rule architecture
-
Business Rule organization and referencing
CAUTION: When creating custom business rules that write to the error log, use care to prevent writing sensitive information to the log. When writing to the error log, the OneStream application attempts to filter sensitive information and redact it. Information in the log that is filtered is replaced with [Redacted].
IMPORTANT: Whether it be OneStream, Partner, or Customer, we strongly advise against any sensitive or confidential information be included in business rules.
See the API Overview Guide.
Implementing Security › Business Rules
The platform is comprised of multiple processing engines. These engines have distinct responsibilities with respect to system processing and consequently they expose different API interfaces to the Business Rules they call. This section provides a brief overview of each engine in the platform and describes the engine’s core responsibilities.
Workflow Engine
The Workflow Engine is thought of as the controlling engine or the puppeteer. The main responsibility of this engine is to control and track the status of the business processes defined in the Workflow hierarchies. This engine is primarily accessed through the BRApi and can be called from other engines in order to check Workflow status during process execution. The Workflow Engine provides a very rich event model allowing each Workflow process to be evaluated and reinforced with customer specific business logic if required (see Appendix 2: Event Listing).
Stage Engine
The Stage Engine performs the task of sourcing and transforming external data into valid analytic data points. The main responsibility of this engine is to read source data (files or systems) and parse the information into a tabular format. This allows the data to be transformed or mapped to valid Members defined by the Finance Engine. The Stage Engine is an in-memory, multi-threaded engine that provides the opportunity to interact with source data as it is being parsed and transformed. In addition to parsing and transforming data, the Stage Engine also has a sophisticated calculation that enables data to be derived and evaluated based on incoming source data. The Stage Engine provides quality services to source data by validating, mapping, and executing Derivative Check Rules.
Finance Engine
The Finance Engine is an in-memory financial analytic engine. The main responsibility of this engine is to enrich and aggregate base data cells into consolidated multi-Dimensional information. The Finance Engine provides the opportunity to define sophisticated financial calculations through centralized Business Rules as well as member specific Business Rules (Member Formulas). It works concurrently with the Stage Engine to validate incoming intersections and works with the Data Quality Engine to execute Confirmation Rules which are used to validate analytic data values.
Data Quality Engine
The Data Quality Engine is responsible for controlling data confirmation and certification processes. This Confirmation Engine is used to define and control the sequence of data value checks required to assert the information submitted from a source system is correct. The Certification Engine is responsible for managing user certifications and determining the Workflow dependents’ completion status. This engine is primarily accessed through the BRApi and may be called from other engines in order to check data quality status during process execution.
Data Management Engine
The Data Management Engine provides task automation services to the platform. This engine executes batches of commands that are organized into sequences which contain steps. Steps represent entry points or mechanisms to execute features of other engines. For example, the Clear Data Step uses the services of the Finance Engine. In addition, the Data Management Engine can execute a Business Rule Step which executes a custom Business Rule as part of a Data Management Sequence. This is an incredibly powerful capability because it provides the ability to string together any combination of predefined processing steps with custom Business Rule steps.
Presentation Engine
The Presentation Engine provides extensive data visualization services to the Platform. The Presentation Engine is made up of the following component engines: Cube View Engine, Dashboard Engine, Parameter Engine, Book Engine and Extensible Document Engine. The Presentation Engine is responsible for managing and delivering content to the end user as well as providing a development environment for custom user interface elements. This engine enables theOneStream Solutionapplication development capabilities and continues to evolve with each product release. Like the Data Management Engine, the Presentation Engine interacts with and can call the services of all other engines in the product.
Scaling Engine
This feature will be made available in a future release.
The Scaling Engine provides services that will determine whether the customer wants to Scale their Server Set or Database Elastic Pool on the Platform. This is only available to Cloud (Azure) and does not pertain to On-Premise solutions. For example, customer must be utilizing Azure Scale Set, and/or SQL Server Elastic Pool functionality. This provides the ability to create or delete a VM and/or increase/decrease database resources based on the logic that is designated in the System Extender Business Rules to meet the customer needs.
Implementing Security
PowerShell is an object-oriented programming language and interactive command line shell for Microsoft Windows. It was designed to automate system tasks, such as batch processing and create systems management tools for common processes.PowerShell includes over 130 standard command line tools for functions that formerly required users to create scripts in VB, VBScript or C#.
PowerShell offers a variety of ways to automate tasks which include:
-
Cmdlets : Very small .NET classes that appear as system commands.
-
Scripts: Combinations of cmdlets and associated logic.
-
Executables: Standalone tools.
Instantiation of Standard .NET Classes
PowerShell integrates with the .NET environment and can be embedded in other applications. Over one hundred cmdlets are included and can be used separately or combined to automate more complex tasks. You can also create and share cmdlets.
PowerShell is built into Windows Server 2008 and Windows 7, provided as an optional feature during installation. You can use Windows Task Scheduler to automate PowerShell script execution.
Using PowerShell Script Editor
To run PowerShell on Windows 7 or a later version:
-
Select Windows > Start, then enter "PowerShell".
-
Select All Programs > Accessories |Windows PowerShell.
You can use these programs with PowerShell:
-
Windows PowerShell ISE: An integrated script editor you can use to type PowerShell commands and to edit and run PowerShell script files. These are text files with a ps1 extension.
-
Windows PowerShell: A command line execution tool similar to a DOS prompt. You can use this tool to run commands or script files but you cannot create or modify scripts.
Configuring PowerShell for the Client API
Perform these steps on each machine that will use PowerShell before it can be used with the Client API:
-
Execute a PowerShell command enabling the execution of unsigned scripts.
-
Create or alter the PowerShell execution and IDE configuration files, so the script engine understands how to use the .Net Framework v4.0.
-
Install OneStream Studio on each machine executing PowerShell scripts.
Running Unsigned Scripts
Initially, this code needs to run in a PowerShell command prompt to enable PowerShell to run unsigned scripts created on the local computer:
set-executionpolicy remotesigned
Configuration for .Net Framework v.4.0
To use the OneStreamClientApi with PowerShell, PowerShell must be configured to use the .NET Framework v4.0. Perform these tasks:
-
Modify or create these files if they do not exist in C:\Windows\System32\WindowsPowerShell\v1.0:
-
powershell.exe.config
-
powershell_ise.exe.config
-
-
Add this required content to each file:
<?xml version="1.0"?>
<configuration>
    <startup useLegacyV2RuntimeActivationPolicy="true">
        <supportedRuntime version="v4.0.30319"/>
        <supportedRuntime version="v2.0.50727"/>
    </startup>
</configuration>
For more information, see: http://tfl09.blogspot.com/2010/08/using-newer-versions-of-net-with.html.
-
Install OneStream Studio.
Learning PowerShell
Microsoft provides extensive resources to help IT professionals leverage PowerShell. For more information, see: http://technet.microsoft.com/en-us/scriptcenter/powershell.aspx
Using the Client API in a PowerShell Script
OneStreamClientApi specifically enables PowerShell scripts to call a function. This API exposes functions for authentication and Data Management. OneStream expanded the number of functions exposed to this API. The Client API component is installed with the Client API Installer. This API offers a simple set of functions enabling script writers to connect to the server, authenticate, execute OneStream Data Management Sequences, and perform basic data retrieval.
Client API Object Hierarchy
OneStreamClientAPI
LogonInfo
Type
LogonInfo
SI
Type
SessionInfo
Authentication
Logon
Parameters
string webServerUrl
string userName
string password
XFClientAuthenticationType clientAuthenticationType
Return Value
LogonInfo
Logoff
Parameters
None
Return Value
None
OpenApplication
Parameters
string Application
Return Value
LogonInfo
LogonAndOpenApplication
Parameters
string webServerUrl
string userName
string password
string application
XFClientAuthenticationType clientAuthenticationType
Return Value
LogoInfo
EncryptPassword
Parameters
string clearTextPassword
XFClientAuthenticationType clientAuthenticationType
Return Value
string
DataManagement
ExecuteSequence
Parameters
string sequenceName
string customSubstVarsAsCommaSeparatedPairs
Return Value
DataMgmtResult
ExecuteStep
Parameters
string dataMgmtGroupName
string stepName
string customSubstVarsAsCommaSeparatedPairs
Return Value
DataMgmtResult
DataProvider
GetAdoDataSetForCubeViewCommand
Parameters
string CubeViewName
bool dataTablePerCubeViewRow
CubeViewDataTableOptions dataTableOptions
string resultDataTableName
Dictionary<string, string> customSubstVars
bool throwExceptionOnError
Return Value
DataSet
GetAdoDataSetForMethodCommand
Parameters
XFCommandMethodTypeId xfCommandMethodType
string methodQuery
string resultDataTableName
Dictionary<string, string> cistomSubstVars
bool throwExceptionOnError
Return Value
DataSet
Implementing Security
OneStream Web API is a RESTful web service designed to expose OneStream Data Automation functions when interacting with third-party API client applications.
OneStream Web API must be installed on a web server. It also must be configured for external authentication providers supporting OAuth2.0/OpenID Connect authorization protocol. Identity Providers currently supported are Okta, Azure AD (Microsoft Entra ID), and PingFederate.
OneStream Web API is API client agnostic. It accepts and outputs data in JSON format making it possible for every API client application that supports this format to also interact with this service. One of the most widely used API clients is Postman, a Windows app. For more information about how to configure OneStreamWeb API to interact with Postman see the autogenerated documentation at http(s)://[servername]:[port]/onestreamapi.
OneStream Web API endpoints:
Authentication endpoint. Represents a RESTful service for Authentication.
-
POST api/Authentication/LogonAndReturnCookie
Used primarily by the Enablement Team to verify Web API installation completed successfully. Returns a one-time cookie value that holds authentication state or a message indicating failure along with a proper HTTP code.
DataManagement endpoint. Represents a RESTful service of Data Management.
-
POST api/DataManagement/ExecuteSequence:
Executes a Data Management Sequence and returns a success/failure message along with a proper HTTP code.
-
POST api/DataManagement/ExecuteStep
Executes a Data management Step and returns a success/failure message along with a proper HTTP code.
DataProvider endpoint. Represents a RESTful service of Data Provider
-
POST api/DataProvider/GetAdoDataSetForAdapter
Returns a JSON representation of a DataSet a given Dashboard Adapter or a failure message along with a proper HTTP code.
-
POST api/DataProvider/GetAdoDataSetForCubeViewCommand
Returns a JSON representation of a DataSet for a given Cube View or a failure message along with a proper HTTP code.
-
POST api/DataProvider/GetAdoDataSetForSqlCommand
Returns a JSON representation of a DataSet for a given SQL Query or a failure message along with a proper HTTP code. Administrator role is required for this functionality.
-
POST api/DataProvider/GetAdoDataSetForMethodCommand
Returns a JSON representation of a DataSet for a given pre-defined list of method commands used by XFDataProvider to fill a DataSet or a failure message along with a proper HTTP code. Administrator role is required for this functionality.
Implementing Security
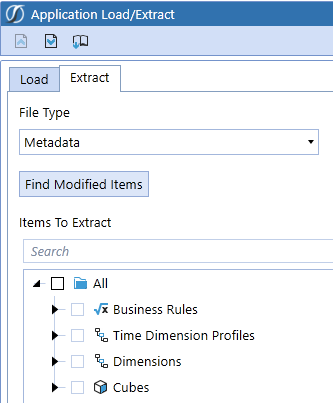
The Application Load/Extract can find Dimension changes and export them into an xml in order to make the metadata migration process easier.
You can extract applications as an XML or zip file. If the file size is larger than 2Gb, you must use a zip file.
When importing, you may have extracted an XML file that was larger than 2Gb in size. You must do a zip extract to successfully load the file.
NOTE: This feature only applies to Dimensions.
Implementing Security
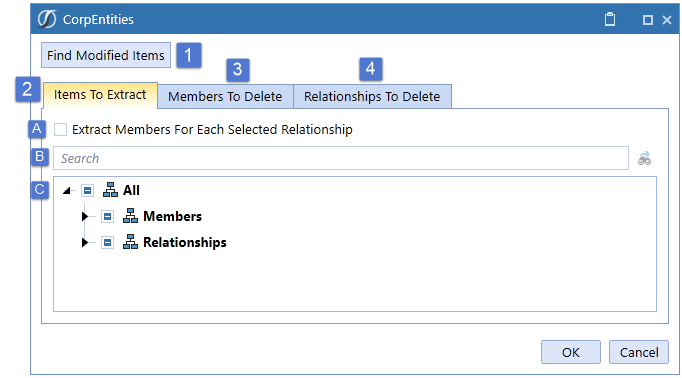
Modified Items can consist of adding/deleting Dimension Members and/or adding/deleting Dimension Relationships. Click Find Modified Items to launch the dialog. This allows users to find Dimension changes by time and user.
-
Enter a user name and a range of time in order to find Dimension Member and Dimension Member Relationship changes. Leave the User field empty in order to find changes by all users.
-
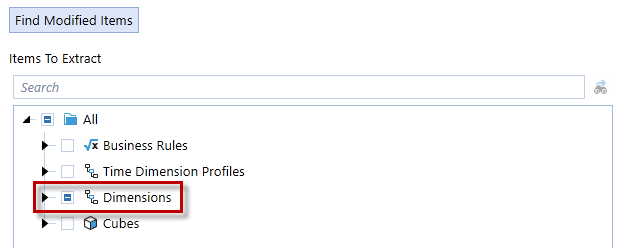
Expand this to see what Dimensions were changed.
-
Right-click on the Dimension name and click Select Members to Extract.
-
Find Modified Items
By default, everything is selected. Click Find Modified Items and enter the username and desired date range in order to find the specific changes made to the selected Dimension. -
Items to Extract Tab
This tab displays the changes found in the hierarchy. Users can also manually select Members and Relationships to extract. -
Extract Members for Each Selected Relationship Check Box
Check this box in order to include the Members used in the selected relationships. -
Search
Search for a specific Member in the selected Dimension. -
Dimension Hierarchy
Scroll through the Dimension hierarchies in order to see where changes occurred and/or manually select or de-select Members or Relationships to extract.NOTE: Right-click on any Parent Member under Relationships and click Select All Descendants in order to select all Child Members within the hierarchy and include them in the extraction.
-
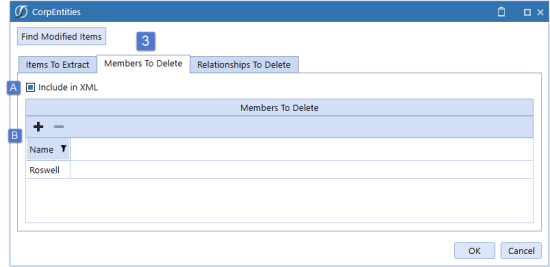
Members to Delete Tab
The Members to Delete tab displays any deleted Members found within the User/Time Parameters. -
Include in XML Check Box
By default, Include in XML is not checked. Check this box in order to include the displayed Members in the extract. If checked, any Members to Delete will have an Action=Delete in the xml file and be deleted upon loading the xml into another application. -
Any deleted Members found within the User/Time Parameters will display here. Click the plus sign to manually add additional Members to delete. To exclude a particular entry from the xml, select the line to exclude and click the minus sign.
NOTE: Members with stored data cannot be deleted from an application.
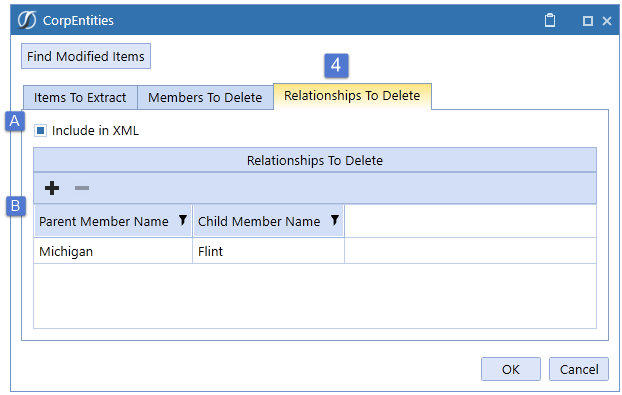
Relationships to Delete
The Relationships to Delete Tab displays any deleted relationships found within the User/Time Parameters.Include in XML Check Box
Check this box in order to include the displayed Member relationships in the extract. If checked, any Relationships to Delete will have an Action=Delete in the xml file and be deleted upon loading the xml into another application.Users can manually add additional relationships to delete by clicking the plus sign and indicating the Parent and Child. To exclude a particular entry from the xml, select the line to exclude and click the minus sign.
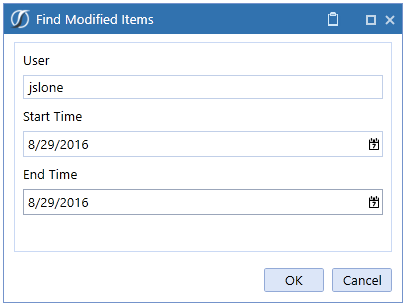
For example, in the application’s Dimension Library, a Member was created, another Member was deleted, and a relationship was deleted. Once the user and time filters are entered, click OK, and these changes will be highlighted.
The hierarchy will indicate where changes were made. The example below indicates there was a partial change to the Dimensions.

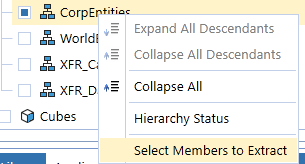
This launches an extraction dialog for the specific Dimension selected.
Implementing Security
When importing an extracted xml file, it processes in the following order:
-
New or changed Members
-
Deleted Members
-
New Relationships
-
Deleted Relationships
NOTE: The processing order is important because if any errors occur during the xml file load, OneStream applies as many modifications as it can up to the point of the error. For example, an xml file contains ten Member changes, three deleted Members and one new relationship. If an error occurs when trying to delete the first Member, the ten Member changes will still take place because they are processed first during the xml load. Any modifications in the xml prior to the error will occur and any after the error will not.
If a user receives an error during the load process, the error must be resolved in order to complete the metadata migration.
Common Load Errors and Resolutions
-
Deleting a Member with data
If a Member without data is deleted from the source application, but that same Member contains data in the destination application, an error occurs and the Member will not be deleted. To resolve the error, do one of the following: -
Clear the Member’s data in the destination application and reload the xml file.
-
Create a new xml extract excluding that Member from the file.
-
Edit the xml file to exclude the Member and the action.
-
Deleting a Member without Data
Care should be taken when deleting Entity members. Even though the member may not have data, it may be in use as an Intercompany Partner. Ensure the member is not in use on any data records, or on records as an Intercompany Partner.
-
Undefined Security Group
If a security group is assigned to a Dimension Member in the source application, but does not exist in the destination application, an error will occur. To resolve the error, do one of the following:-
Create the security group in the destination application and reload the xml file.
-
Create a new xml extract excluding this Member and its changes from the file.
-
Edit the xml file to exclude the Member and the action.
-
-
Undefined FX Rate Type
If a FX Rate Type is assigned to a Scenario Member in the source application, but does not exist in the destination application, an error will occur. To resolve the error, do one of the following:-
Create the FX Rate Type in the destination application and reload the file.
-
Create a new xml extract excluding this Member and its changes from the file.
-
Edit the xml file to exclude the Member and the action.
-
-
Invalid Characters in the XML File
If the xml file was edited and invalid characters were entered for a Member name, an error will occur. To resolve the error, do one of the following:-
Make the Member modifications in the source application and extract an xml file without invalid characters.
-
Edit the xml file and remove the invalid characters.
-
Implementing Security
This extract is for Application Project Designers who are building solutions that span many artifacts, such as Dashboard Maintenance Units, Business Rules, Cubes, Dimensions, Cube Views, etc. A good example is a person designing a solution to be hosted on MarktetPlace. This application Extract and Load option allows all the defined objects, such as Dashboards and Business Rules, to be collected as a single file export package and to be later reloaded as a package. XFProject is used as a convenient way to organize OneStream Solution or similar solutions into a folder structure which can be integrated with a version control system such as “Git.” Doing so could enable more than one team member to work on a solution simultaneously. The developer must create an XML file which is the definition for the contents of the Project export.
Project File
The Application Designer must first manually define an XML file to support the export of objects as aF Project File. The file is saved with the file extension of .xfProj and saved to a local project folder which could also support a version control system.
Sample File:

File Structure:
-
xfProject: The root node to start a .xfProj which contains two attributes:
-
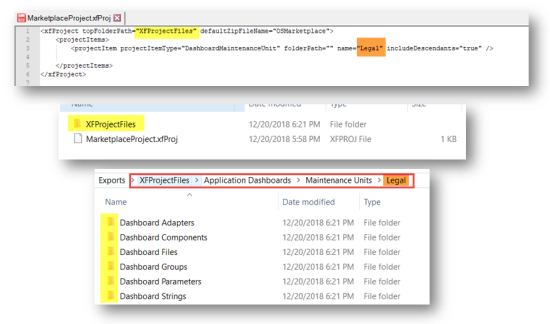
TopFolderPath: Will create and define the starting folder location of where the specified files are extracted to.
-
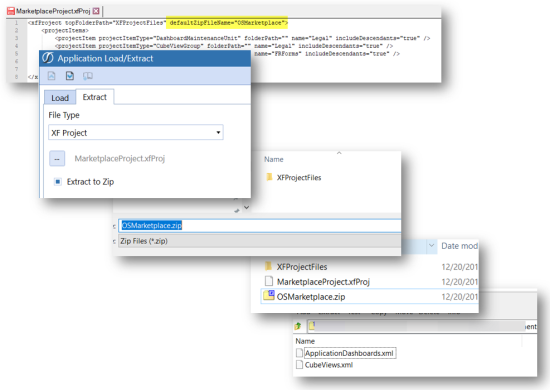
DefaultZipFileName: Will create a standard default file name for .zip file extracts.
-
-
projectItems: A list structure containing the project items needed to extract (no attributes needed).
-
projectItem: The item reflecting what is needed to extract from OneStream or load from the file system. It has 4 attributes:
-
ProjectItemType:
-
BusinessRule
-
Cube
-
CubeViewGroup
-
CubeView
-
CubeViewProfile
-
DashboardMaintenanceUnit
-
DashboardFile
-
DashboardString
-
DashboardParameter
-
DashboardGroup
-
DashboardAdapter
-
DashboardComponent
-
Dashboard
-
DashboardProfile
-
DataManagementGroup
-
DataManagementStep
-
DataManagementSequence
-
DataManagementProfile
-
DataSource
-
Dimension
-
TransformationRuleGroup
-
TransformationRuleProfile
-
-
FolderPath: The name of the sub folder where the project item type is extracted to.
-
Name: The name of the project item.
-
IncludeDescendants: Default is true and only affects these project item types:
-
CubeViewGroup
-
DashboardGroup
-
DashboardMaintenanceUnit
-
DataManagementGroup
-
-
File Extract
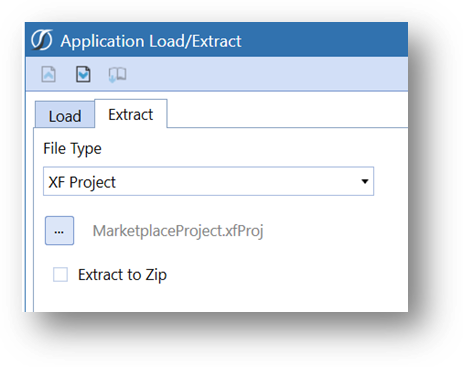
The .xfProj file is placed in a local folder, such as the user’s desktop. The defined folderpath folders will be generated here as the target location for application exports and loads. There are two file extract options available on the Windows App.
-
.zip: The export option will collect all the objects defined in the .xfProj file as a Zip file to the location of the .xfproj file.
-
File: The standard export will export all the objects defined in the .xfProj file to the folderpath locations defined in .xfproj file.
-
Navigate to Application > Load > Extract.
-
Select the Extracttab.
-
Browse and select the .xfProj file.
-
(Optional) From the OneStream Windows Client, select or de-select Extract to Zip as required.
-
Click the Extract toolbar button.
Example:
The contents will be generated in the defined folder paths.
Zip Extract
The zip file extract will create an application zip file containing all the objects defined.
File Load .xfProj
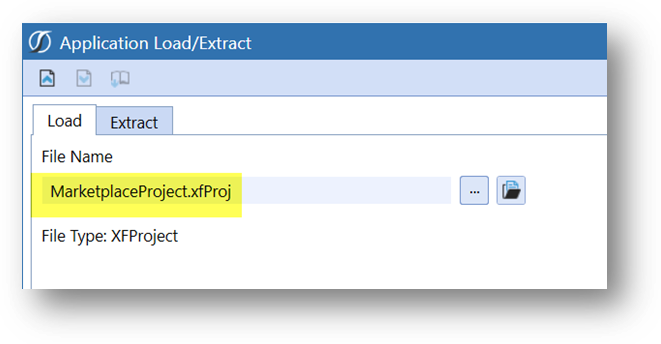
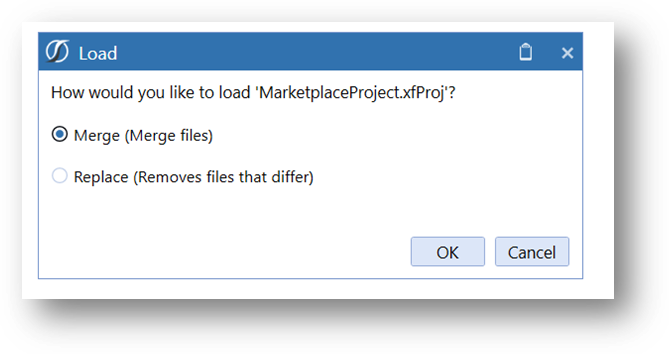
The file load using the defined .xfProj file provides a seamless link to the project files. When loading an .xfProj file, the user is presented with options to “Merge” or “Replace” the target files. The only files affected are those defined by the .xfproj file.
NOTE: If you select Replace, it will only remove files that differ for CubeViewGroups, DataManagementGroups, DashboardMaintenanceUnits, and DashboardGroups. For all other items (such as, business rules or extensibility rules), if you select Replaceit will act as a Merge.
-
Navigate to Application > Load > Extract.
-
Click the Loadtab.
-
Browse and select the .xfProj file.
-
Click the Load toolbar button.
-
Select the Load Method, Merge or Replace.
Zip Load
The zip file load functions as any other application file load. The contents of the file are merged into the application. The zip file load is not supported by alternative merge or replace file load options.