The following roles apply to the entire system, not just one Application.
Manage System Dashboards - Use to manage all System Dashboards regardless of access to certain Dashboards. This role links the SystemPane Role and the System User Interface Roles section, meaning this security role must include this group in order to be active.
Manage System Database Files -There are two file systems in the Framework database (such as the System database) and each Application database. Users with the ManageSystemDatabaseFiles and ManageApplicationDatabaseFiles roles have read and write access to all folders and files in these file systems, respectively. Other users can be given read and/or write access to specific folders in the database file systems using the a folder’s security settings. This option ties the FileExplorerPage role from the System User Interface Roles section, meaning this security role must include this group in order to be active.
Manage File Share - The File Share is a Windows folder that Application Servers can read and write. It is configured in the XFAppServerConfig.xml file using the FileShareRootFolder setting. The File Share is a server-side storage area where external systems or IT can stage and upload ifles. Users with the ManageFileShare role can edit these folder and files using File Explorer.
Performing System Administration
Application server configurations can now be made by Administrators and advanced IT persona. Common requests that resulted in support calls can now be addressed internally by advanced OneStream users with the proper access. This process also eliminates the need for an IIS restart for the changes to take place. Understand that as settings changed and saved, they are automatically applied every two minutes.
There are two system roles that manage six categories of configurations. The application maintains an audit trail so changes to the configurations are accessible. Upon install, the application server configurations are enabled by default. To mitigate misuse of configurations settings, Customer Support can disable full features, sections, and property changes via XML/App config.
System Roles
Two roles exist to grant Administrators and advanced IT users the ability to change server configurations:
System Security Role: ManageSystemConfiguration
-
Default to Nobody
-
Not automatically granted to Administrator
System User Interface Role: SystemConfigurationPage
-
Default to Administrator Group - Administrators will have read-only rights
-
System User Interface Role should be “view only” to all users assigned
System Configurations
There are six categories of system configurations:
-
General
-
Environment
-
Memory
-
Multithreading
-
Recycling
-
Database Server Connections
NOTE: Memory and Multithreading system configurations must be enabled. Customers should contact support to have this configuration change made for them.
An IIS restart is not required to capture changes as they are automatically applied every two minutes. Saved changes are tracked via the Audit tab, which is available for each server configuration.
When enabled, permitted users can adjust system configurations in app by navigating to System>Administration>System Configuration.
Performing System Administration › Application Server Configurations
When the box and setting are greyed out, the property is set based on the configuration file. Deselect the box to adjust your custom value then save. This overrides the configuration file. Select the property's box again to default back to the configuration file.
NOTE: Improperly modifying certain server configurations can impact overall environment or application performance. Consult OneStream support for recommendations.
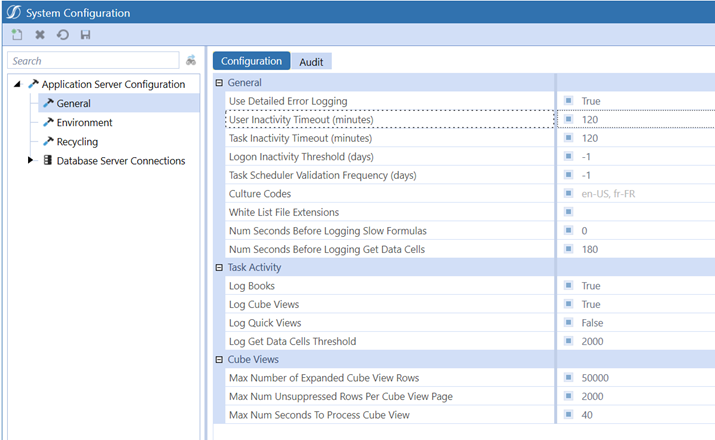
General Menu
Use Detailed Error Logging: When true, stack trace information is shown. When false, stack trace information is not shown.
User Inactivity Timeout (minutes): Set the number of minutes a user is timed out due to inactivity.
Task Inactivity Timeout (minutes): Set the number of minutes a task is timed out due to inactivity.
Logon Inactivity Threshold (days): Set the Logon Inactivity Threshold (days) to the number of days of inactivity before the user can no longer access the system. Set to -1 to disable the setting.
Task Scheduler Validation Frequency (days): Set the number of days in which the Task Scheduler validation runs.
Culture Codes: Set the appropriate code for display settings using the standard Microsoft Local designation for each language. (ex. en-US)
White List File Extensions: When blank, any file type can be saved to a root folder then uploaded. Add custom file types by clicking the box then the ellipses to restrict the types of files which will be supported in the File Explorer.
Num Seconds Before Logging Slow Formulas: Set the number of seconds before slow formulas are logged. This will enable logging of formulas and impact consolidation performance. Disable when no longer required.
Number Seconds Before Logging Get Data Cells: Set the number of seconds before Get Data Cells are logged. Default is 180 and should only be increased for debug purposes
Task Activity Menu
Log Books: When set to True (default), a log is created in Task Activity when the items are included as Task Activity steps for that specific book. The intention of this feature is to verify entries in the Task Activity grid and the settings in the configuration file work as expected.
Log Cube Views: When set to True, a log is created in Task Activity when a Cube View is opened, a report is run or an export to Excel is completed in the data explorer. The intention of this feature is to analyze data analysis performance.
Log Quick Views: When set to True, a log is created in Task Activity when a new Quick View is created or when rows/columns are shifted/moved around. The intention of this feature is to analyze data analysis performance.
Log Get Data Cells Threshold: This logs the calls to GetDataCells and GetDataCellsUsingScript. It includes context information such as the Excel file name or the Cube View name. It only creates logs if the number of Data Cells being requested is equal to or greater than the value provided in this field.
Cube Views Menu
The Cube View configurations will impact all Cube Views in an application environment. They are designed to optimize the Cube View performance through managing the page size and initiating paging which will maximize the availability of server resources. These settings can be overridden to tailor the design and performance of a specific Cube View, using the General Settings/Common/Paging properties found on each Cube View.
Max Number of Expanded Cube View Rows: Set the max number of rows displayed when using an expanded Cube View.
Max Number of Unsuppressed Row Per Cube View Page: The default value of 2000 is used, which is determined by the settings on the OneStream Server Configuration Utility, The maximum value is 100,000 rows. If the Cube View performs well, but you want 2500 rows to display, for example you may want something in the tree to display in the first page, then you would increase the rows.
Max Number Seconds To Process Cube View: This setting impacts paging behavior. The default value of 20 will be used which is determined by the OneStream Server Configuration Utility. The maximum value is 600 seconds.
Performing System Administration › Application Server Configurations
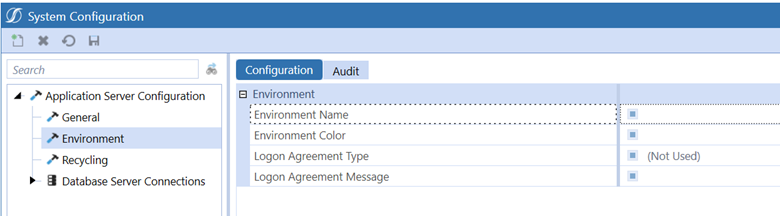
Environment
The configurations allow the Administrator to tailor the environment login process for the user by providing a custom label or by triggering an acceptance criteria upon each login.
Environment Name: Enter the name to be displayed (in white) for the environment. You can enter up to 150 characters.
Environment Color: Specify a provided environment color or enter a hex value to display the name on a colored background.
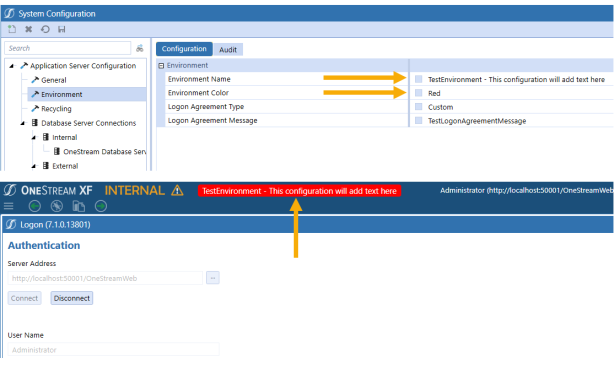
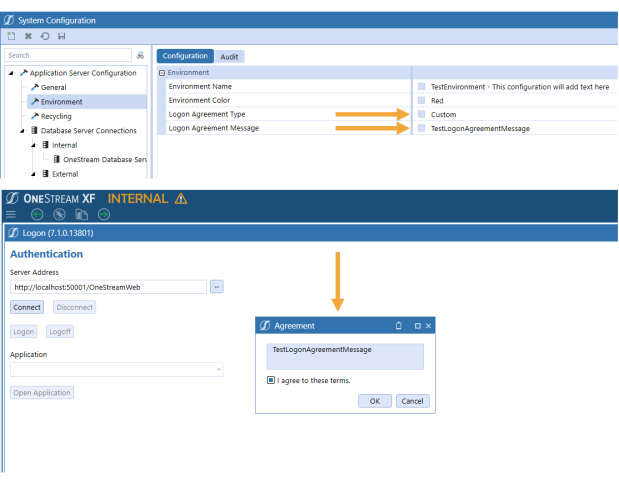
Logon Agreement Type: To display a specific message after a user logs on, select Custom and enter the message text.
Logon Agreement Message: Enter the message text.
Full Width Banner

The configurations allow you to display information across the top banner indicating varying levels of severity. The banner can be permanently displayed or dismissible.
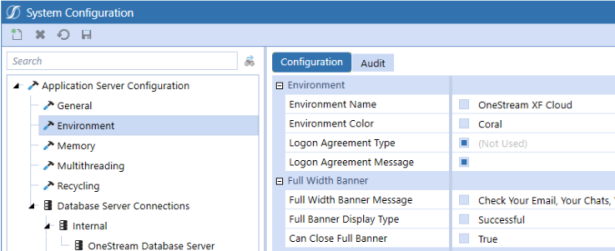
Full Width Banner Message: Enter the banner message text to be displayed.
Full Banner Display Type: Indicate the severity of the message by selecting Informational, Warning, Successful, or Critical from the drop-down menu.
| Type | Sample |
| Informational |

|
| Warning |

|
| Successful |

|
| Critical |

|
Can Close Full Banner: When True, the banner may be dismissed after log in. When False, the banner cannot be dismissed.
Performing System Administration › Application Server Configurations
Overtime, server memory may become increasing fragmented, which can affect performance and stability. The default configuration of a daily recycling process is standard. The System Configuration page allows the administrator to tailor when these events occur to be best suited for their implementation.
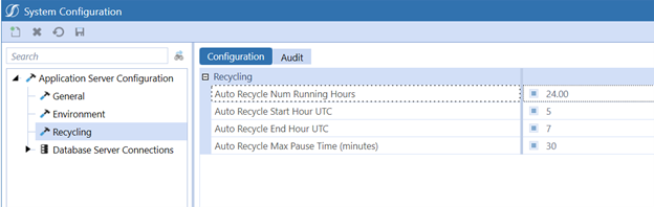
Recycling Menu
Auto Recycle Num Running Hours: Default is 24, which means once a day, the server will recycle. Automatic Recycling allows Application Servers a chance to recycle, which is a recommended practice. These first four settings control this behavior.
Auto Recycle Start Hour UTC: Default is 5, which means 05:00 UTC time. This is the earliest time in a day when a server can automatically recycle. It is best to set this and the End Hour to be a range of time with the lowest amount of Application Server activity.
Auto Recycle End Hour UTC: Default is 7, which means 07:00 UTC time. This is the latest time in a day when a server can automatically recycle.
Auto Recycle Max Pause Time (minutes): Default is 30. This means that when it is time to recycle a server automatically, it will first pause from accepting more server tasks, but allow for existing assigned tasks to complete processing for 30 minutes before recycling. If there are no active tasks for this server, it will recycle when the time comes.
Performing System Administration › Application Server Configurations
The Database Server Connections provides the Administrator with greater visibility into the structure of their environment. Additionally, the administrator can quickly and easily establish database connections to support their model's design requirements.
An IIS restart is not required to capture changes as they are automatically applied every two minutes. Saved changes are tracked via the Audit tab, which is available for each server configuration
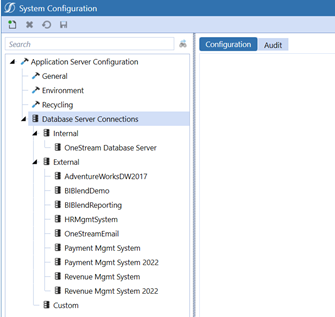
Database Server Connections
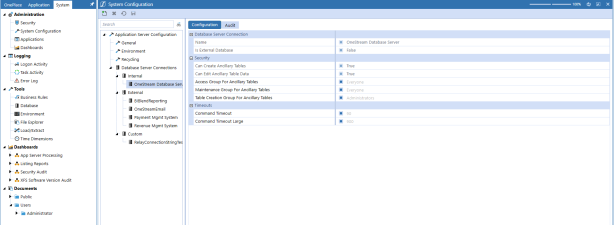
Internal Menu
Configure Database Server Connection, Security, and Timeouts settings from this menu.
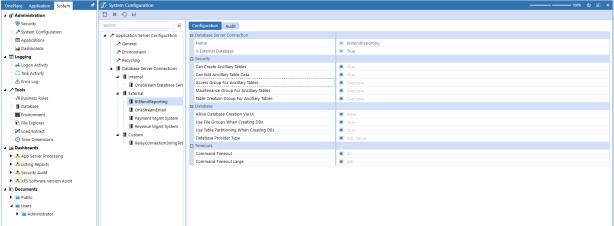
External Menu
Configure Database Server Connection, Security, Database, and Timeouts settings from this menu.
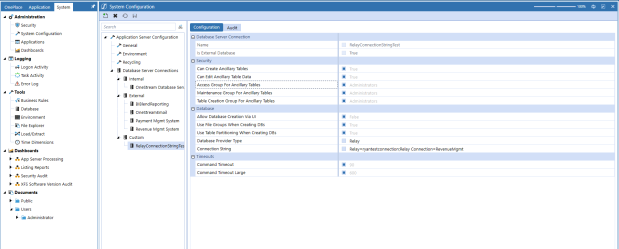
Custom
Configure Database Server Connection, Security, Database, and Timeouts settings from this menu.
External only and the Connection String will be visible without displaying password and Customer can Edit.
-
Connection String will allow for Edits
-
Connection String will display “?” where password is used
-
Connection String can be modified without changing password and saved with “?” not overriding original password
-
Connection String password can be modified and upon save will display “?” in UI
-
Connections Strings using the following will be masked in the UI: pwd; pass; password
-
All others will display password and need to be addressed separately – majority of connection strings password will be handled above
-
Pre-existing External Connections, when moving over to Customer Connections, should use the previous name to avoid breaking any connections with Task Scheduler, Business Rules, etc.
Performing System Administration
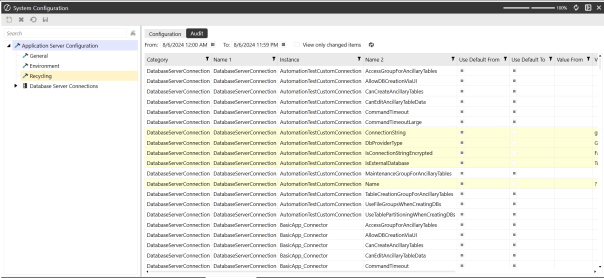
Configuration setting changes are tracked via the Audit tab. View changes by navigating to System > System Configuration > Audit.
System Database Tables audits are viewed by navigating to System > Tools > Database > SystemConfig.
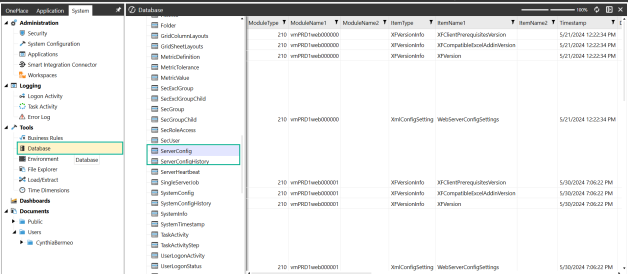
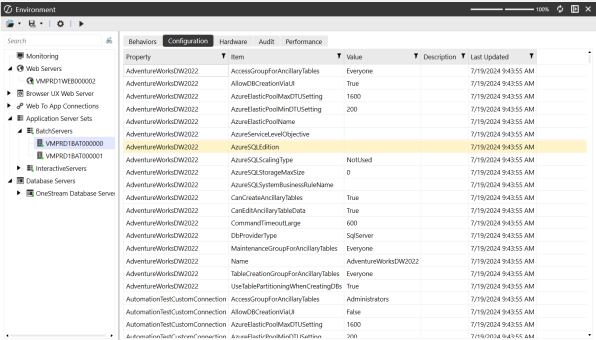
The Environment will show what settings the server is currently using. The server updates every 2 minutes. Here the user can see what settings are being picked up. The “Last Updated” column shows the date and time settings were changed. Regardless of what type of connection (Internal, External, Custom) any available configurations that can be changed will show up here.
Environment audits are viewed by navigating to System > Tools > Environment > Application Server Sets
Performing System Administration
Manage System Security allows non-administrators to manage users, roles and groups and facilitates a comprehensive, functionally-tailored way to separate user and group responsibilities.
By default Administrators have access to all security roles. Assigning other groups to roles does not remove an Administrator's complete system access. Users with Manage System Security roles can access to the System User Interface Roles of SystemAdministrationLogon and SystemPane.
Roles are not exclusionary or limiting. If granted, users can get additional functionality through their membership in groups having corresponding role assignments. See System Security Roles.
For example:
-
A member of the IT team who is not an administrator might need to manage the system security roles.
-
An employee in the Accounting department who reports to the Controller over consolidations may manage groups and not need access to other areas of the system.
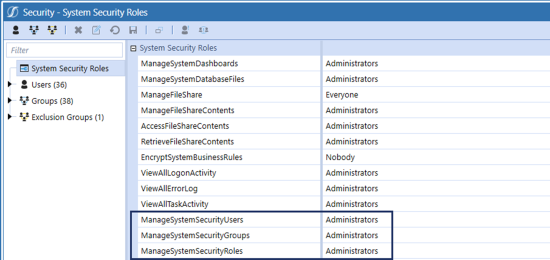
You can delete these security roles to non-Administrators:
-
ManageSystemSecurityUsers: Grants permission to manage users.
-
ManageSystemSecurityGroups: Grants permission to manage groups, exclusion groups and group membership.
-
ManageSystemSecurityRoles: Grants permission to manage system security role assignment.
Access System Security Roles
-
From the System tab, go to Administration > Security.
-
Select System Security Roles.
Manage System Security Users
This role enables you to:
-
Create users
-
Modify users
-
Delete users
-
Disable users
This role enables you to specify these user properties:
-
General
-
Authentication
-
Preferences
-
Custom Text
Limitations
Users with the Manage System Security role cannot create, modify, or delete administrators, directly or indirectly. Also, they cannot:
-
Add or remove themselves to or from groups or roles.
-
Delete themselves.
-
Add other users to Manage System Security privileges.
-
Add or remove groups they are members of from roles.
To manage group membership or copy users, the ManageSystemSecurityGroup is required.
Manage System Security Groups
This role lets you manage groups and exclusion groups. You can also:
-
Add or remove members to or from groups and exclusion groups.
-
Copy groups except groups with Administrator privileges.
Limitations
Users with this role cannot:
-
Modify the Administrators group.
-
Assign users to a group that establishes Administrator privileges.
-
Modify your membership in other groups.
-
Modify the parent group of a group in which the user is a member.
Manage System Security Roles
This role lets you manage system security roles. However, you cannot:
-
Modify the ManageSystemSecurityRole itself because it requires Administrator level privileges.
-
Assign the Everyone or Nobody groups that require Administrator level privileges.
-
Add a group to a role of which you are a member.
Load and Extract
Load and Extract functionality of Security requires a user to have permissions for all three of the Manage System Security roles, as well as the System User Interface Roles of SystemLoadandExtractPage.
The controls limiting Manage System Security user's capabilities is enforced during the Load and Extract process. Validation occurs by comparing the current state of security in the target environment to the changed state determined by the processing of the source file. Therefore, the validation of XML loads for Manage System Security users requires that security is pre-existing to determine the changed state.
For example, although Manage System Security users cannot create Administrators, if the current Administrator Groups existed in the target environment prior to the XML load, then the XML will pass the validation and will be loaded. However, when an empty or new environment exists with no pre-existing users and groups, then an Administrator would need to perform the load.
BRApi
You can manage user and group system security using BRApi functions such as CopyUser, DeleteUser and CopyGroup. These are controlled by the assigned Manage System Security role. See System Security Users and Groups for more information.
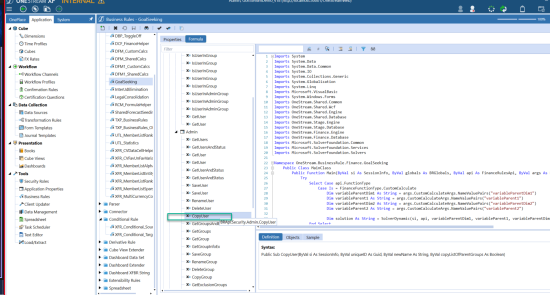
For example, if a dashboard is created to insert new users, and a dashboard button executed a BRApi to insert a user, the system validates that the user clicking the button is in the Administrators Group or has role permission to ManageSystemSecurityUsers.
Combined Roles
When granted access to more than one of these roles, you gain more functionality within the scope of the designed capabilities and restrictions. For example, if you have both the role of users and groups, you can copy a User or you can also can add a user to a group. Certain functionality requires assignment of combined roles, such as Load and Extract.
Performing System Administration
The following roles grant access to key features and tools.
SystemAdministrationLogon
This is for the System Administration application and set to Administration by default. When a security group is assigned to this role, it becomes available in the Application list during logon.
SystemPane
Based on the security group chosen, this role lets you access the System Tab found at the bottom left of the screen. By default, only administrators have access to this tab.
ApplicationAdminPage
Based on the security group chosen, this role lets you access the Application tab at the bottom left of the screen. By default, only administrators can access this tab.
SecurityAdminPage
Based on the selected security group, this role lets you view but not modify security artifacts and settings other than your password on System > Administration. By default, only administrators have access to this section.
SystemDashboardAdminPage
Based on the security group chosen, this will allow a user access to the Dashboard section found under System Tab > Administration > Dashboards. This section ties to the ManageSystemDashboards which is under the System Security Roles in the above section. By default, only administrators have access to this.
ApplicationServersPage
Based on the security group chosen, this will allow a user access to the Application Servers section found under System Tab >Tools > Application Servers. By default, only administrators have access to this.
DatabasePage
This role lets you access the Database Page on System > Tools. By default, only system administrators have access to this section.
FileExplorerPage
Based on the selected security group, this role lets you access the File Explorer on System >Tools. This section ties to the ManageSystemDatabaseFiles and ManageFileShare roles. By default, only administrators can access the File Explorer.
SystemLoadExtractPage
Based on the security group chosen, this role lets you access Load/Extract on System > Tools but you cannot actually import or extract items. By default, only administrators have access to this section.
ErrorLogPage
Based on the security group chosen, this role lets you access Error Log on System > Logging. By default, only administrators can access to this section.
LogonActivityPage
Based on the selected security group, this role lets you access to Logon Activity on System > Logging. You can view all users, but cannot log them off. By default, only administrators have access to this section.
TaskActvityPage
Based on the selected security group, this role lets you access Task Activity in System > Logging. By default, only administrators can access to this section.
TimeDimensionPage
Based on the security group chosen, this will allow a user access to the Time Dimension on System > Tools. By default, only administrators have access to this section.
Performing System Administration
Administrators click System > Administration > Security to define and manage users, groups and system security roles (roles). Users, groups and roles are not application-specific. See Creating and Managing Groups and Creating and Managing Users .
Every user must be assigned a user ID. Users can be added as native users or as references to users stored in external repositories (e.g. Active Directory). Users can be externally authenticated with these standard providers.
-
LDAP
-
MSAD
-
Okta
-
PingFederate
-
Azure AD (Microsoft Entra ID)
-
SAML
For information about external authentication with standard providers, see the Installation and Configuration Guide.
Managing Users and Groups Using BRApi Functions
Administrators can manage users and groups with the following BRApi functions:
BRApi.Security.Admin.GetUsers
BRApi.Security.Admin.GetUser
BRApi.Security.Admin.GetUser
BRApi.Security.Admin.SaveUser
BRApi.Security.Admin.RenameUser
BRApi.Security.Admin.DeleteUser
BRApi.Security.Admin.CopyUser
BRApi.Security.Admin.GetGroupsAndExclusionGroups
BRApi.Security.Admin.GetGroups
BRApi.Security.Admin.GetGroup
BRApi.Security.Admin.GetGroupInfoEx
BRApi.Security.Admin.SaveGroup
BRApi.Security.Admin.RenameGroup
BRApi.Security.Admin.DeleteGroup
BRApi.Security.Admin.CopyGroup
BRApi.Security.Admin.GetExclusionGroups
BRApi.Security.Admin.GetExclusionGroup
BRApi.Security.Admin.SaveExclusionGroup
BRApi.Security.Admin.RenameExclusionGroup
BRApi.Security.Admin.DeleteExclusionGroup
BRApi.Security.Admin.CopyExclusionGroup
BRApi.Security.Admin.GetSystemRoles
BRApi.Security.Admin.GetApplicationRoles
BRApi.Security.Admin.GetRole
BRApi.Security.Admin.CopyExclusionGroup
Examples
Get a UserInfo object and change the User Description
Dim objUserInfo As UserInfo = BRApi.Security.Admin.GetUser(si, "Administrator")
If Not objUserInfo Is Nothing Then
objUserInfo.User.Description = "New Description"
BRApi.Security.Admin.SaveUser(si, objUserInfo.User, False, Nothing, TriStateBool.Unknown)
End If
Get a Group and UserInfo object and add the Group to the User's list of parent Groups
Dim objGroupInfo As GroupInfo = BRApi.Security.Admin.GetGroup(si, "TestGroup")
If Not objGroupInfo Is Nothing Then
Dim objUserInfo As UserInfo = BRApi.Security.Admin.GetUser(si, "TestUser")
If Not objUserInfo Is Nothing Then
If (Not objUserInfo.ParentGroups.ContainsKey(objGroupInfo.Group.UniqueID)) Then
Dim parentGroupIDs As List(Of Guid) = objUserInfo.ParentGroups.Keys.ToList()
parentGroupIDs.Add(objGroupInfo.Group.UniqueID)
BRApi.Security.Admin.SaveUser(si, objUserInfo.User, True, parentGroupIDs, TriStateBool.Unknown)
End If
End If
End If
Create a User
Dim objUser As User = New User()
objUser.Name = "NewUser"
objUser.Text1 = "Test Text 1"
BRApi.Security.Admin.SaveUser(si, objUser, False, Nothing, TriStateBool.Unknown)
Create a Group
Dim objGroup As Group = New Group()
objGroup.Name = "NewGroup"
Dim objGroupInfo As GroupInfo = New GroupInfo()
objGroupInfo.Group = objGroup
BRApi.Security.Admin.SaveGroup(si, objGroupInfo, False, Nothing, TriStateBool.Unknown)
Performing System Administration
Culture-aware number and text formatting can be used with:
-
The web-based client
-
The Excel add-in
-
Server components
For consistency, we recommend that each user’s Culture setting match the Windows Regional settings of their primary computer.
Specifying Culture Settings on the Client Machine Operating System
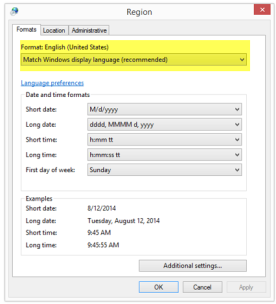
Number and text formatting for Microsoft Excel is controlled by the client operating system’s Windows Regional settings. To configure these settings:
-
Access the operating system’s Control Panel and select Region.
-
Click Format and set properties to reflect regional preferences. For exmple:
-
Click Location and set the Home Location to reflect the operating system’s location such as Canada, Germany or Australia.
Specifying Server Side User Culture Settings
For the web based client and server components, specify culture settings for users by modifying user profiles in Security. The necessary culture codes must first be defined in the Application Server Configuration file.
Performing System Administration
After logging on as an Administrator, you can open the System Administration application that lets you flexibly create a new application based on existing databases or copied databases. For existing Applications, click System > Administration > Applications.
 Create Application Reference
Click to link an application and an existing database if they are from the same release version. Select a Database Server Connection and enter a Database Schema Name. The new Application will display.
Allow Database Creation Via UI must be True in the Application Server Configuration.
 Create Application Database
Click to generate a new database.
Application Name
Enter the name of the new application.
Description
Provide a brief description (optional).
Database Server Connection
Select the database server from the drop-down list.
Database Schema Name
This is created by default and stored in SQL.
Time Dimension Definition
Click the ellipsis and select the desired Time Dimension XML file. See Time Dimensions in System Tools for details.
The new application displays in the Application list when you log on.
NOTE: Database Status indicates if a selected application has an attached database. If the status is "Error", the database was deleted or detached and will not be available in the Application list.
 Delete Selected Application Reference
Click to remove an application's database link. This will not delete database files, just references in the application.
 Test Database Connection
Select an existing application and click the test checkbox  to verify an active connection.
Performing System Administration
System Dashboards are similar to Application Dashboards but differ in that you can use OneStream Framework database objects such as security and users. Application Dashboards use Application-level data stored in Cubes.
See Application Dashboards in Presenting Data With Books, Cube Views and Dashboards for information about designing Dashboards.