Each logging section display content - that you can sort and filter - in a grid. To sort, click a column heading and select ascending or descending.
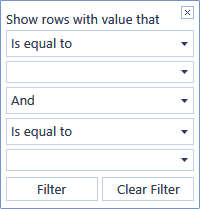
Click on  to filter by criteria such as the following:
Navigate pages by clicking page numbers, the forward button, the back button and so on. These buttons are to the bottom left of a grid. To export data, right-click, select Export and then an export file type.

Logging
Use the following to identify who is logged on who logged off.
 Logoff Selected Session
Administrators can use this to logoff any user session
 Clear Logon Activity
Clears all logon activity
This grid will display:
Logon Status
This shows when users logged on and logged off.
User
This shows the user ID.
Application
This shows the application the user is logged into.
Client Module
This will display items such as Excel.
Client Version
This will display the version of the application you are using.
Client IP Address
This will display the end users IP address.
Logon Time
A time stamp of when the user logged in.
Last Activity Time
A time stamp of the user’s last activity.
Logoff Time
A time stamp of when the user logged off.
Primary App Server
This shows the application server the end user is utilizing.
Logging
You can access task activity to identify user actions in two ways:
-
Click Task Activity at the top right section of the web client.
-
Select System > Logging > Task Activity.
 Clear task activity for current user
Clears all activity for that user.
 Clear task activity for all users
Clears all activity for ALL users.
 Selected task information
Gives the ability to drill down through all steps for that activity.
 Running task progress
Gives the ability to view progress of other users’ activities.
 Refresh
This refreshes the Task Activity in order to see any changes made
Task Type
This shows the user’s activity. (e.g., Consolidate, Process Cube, Load and Transform, Clear Stage Data, etc.)
Description
This shows the details of the activity. (e.g., the POV, Multiple Data Units, etc.)
Duration
This displays the length of time the activity took.
Task Status
This shows the status of the activity. (e.g., Completed, Failed, etc.) Canceling the task will transition it from Canceling to Canceled.
User
This shows the user ID.
Application
This shows the application to which the task was processed.
Server
This shows the application server being utilized.
Start Time
The starting time stamp of the activity.
End Time
The ending time stamp of the activity.
Queued CPU
This provides the % CPU utilization for when the task was initiated.
Start CPU
This provides the % CPU utilization when the job began from the queue.
For more details, Task Queuing, see Data Management in Application Tools.
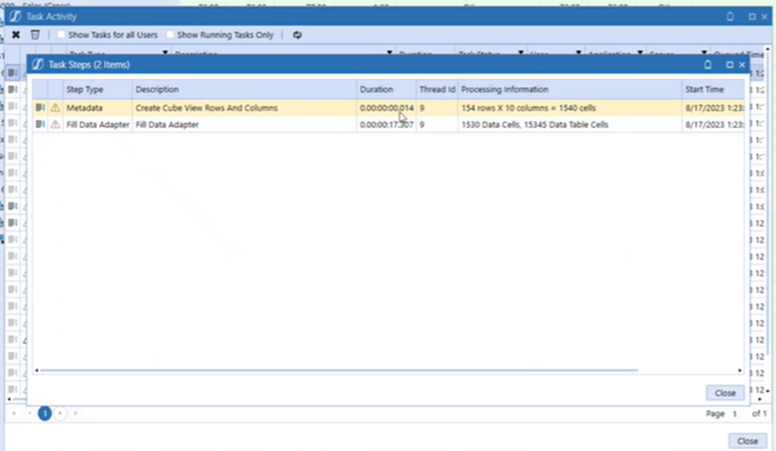
Within the grid, there are two icons on the left side of the row. If highlighted, there is the ability to drill down by clicking on them.

The first icon shows child steps within a particular task that has run. The second shows detailed information of the error when present.
Logging › Task Activity
Logging › Task Activity
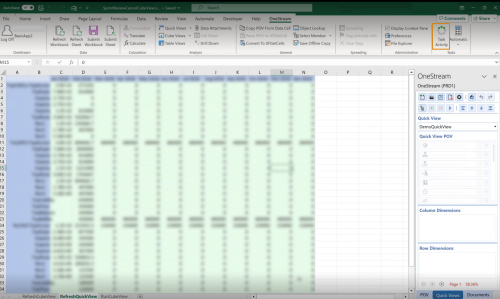
You can cancel a long-running cube view in Excel Add-In. You do not have to be logged into the Windows application. The Task Activity in Excel Add-In allows you to cancel your task. If you are an Administrator, you can cancel another user's running task. You can access the Task Activity icon in the Excel Add-In in the Tasks section in the OneStream ribbon.
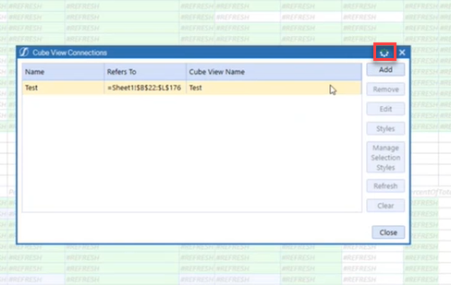
You can also access the Task Activity icon in the Cube View connection dialog box. This allows you to cancel while in the process of establishing a connection to the longer-running cube view.
NOTE: This Task Activity icon in the Cube View connection dialog box is also featured in the Windows Application.
You must click the Task Activity icon to review all cube views. Click the Running Task Progress button to bring the Task Progress dialog box that displays an indeterminate progress bar. In the Task Progress dialog box, you can cancel the task by clicking the Cancel Task and Close buttons. The Close button does not cancel or close the actual task; it only closes the Task Progress dialog box for that specific task.
In Task Activity, the Task Status column will display whether the task was canceled by a User or Administrator. The Task Status also displays "Running" while the Task is still running and "Completed" if the task successfully completed without being canceled. If you are an Administrator, you have the option to show tasks for all users and show running tasks only. Non-admins have the option to show running tasks only. You can also can cancel another user's running task. Each task will have its task type, such as Quick View and Cube View.
Task Activity: Cancel Quick Views
In Task Activity, a User or Administrator can cancel a long-running Quick View.
In the OneStream spreadsheet and Excel Add-In,
-
Create a Quick View or Refresh a Quick View to cancel the long running Quick View. Information will begin to populate and your cursor will start to spin.
-
Click Task Activity and a Quick View task type displays in the Task Activity dialog box.
-
Use the Running Task Progress button to open the Task Progress dialog box.
-
In the Task Progress dialog box, it will display the indeterminate load bar. Use the Cancel Task button to cancel your task.
-
Then, click Close in the Task Progress dialog to close it, or leave it open for it to close on its own when the cancel is completed.
-
Click the Refresh button in the Task Activity dialog.
-
Click on Child Steps or Task Information to review the canceled task.
NOTE: You can click Child Steps in the Task Activity to review all specific task steps for Quick Views or Cube Views.
Task Activity: Cancel XFGetCell Refresh
You can cancel an XFGetCell function conversion within Excel Add-In or OneStream spreadsheet.
-
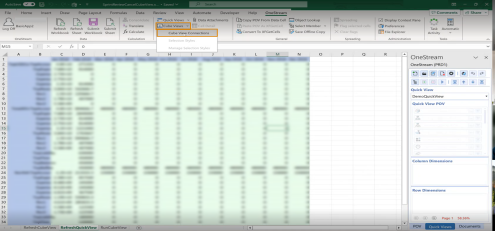
In the Windows Application, under Tools, click Spreadsheet, click on Cube Views in the OneStream ribbon. In Excel Add-In, under the OneStream ribbon, click Cube Views.
-
Click Cube View Connection and add the cube view connection.
-
Once Cube View is loaded, click on the Convert to XFGetCells button in the OneStream ribbon or right click in the cube view and select OneStream > Convert to XFGetCells.
-
Click Refresh Sheet.
-
Click Task Activity and a Get Excel Data task type displays in the Task Activity dialog box.
-
Use the Running Task Progress button to open the Task Progress dialog box.
-
In the Task Progress dialog box, it will display a progress bar. Use the Cancel Task button to cancel your task.
-
Refresh the Task Activity dialog box. The Task Activity dialog box will display the task status if the user or administrator canceled the task.
NOTE: In Task Activity, when canceling a task, a progress bar with a percentage load will display for XFGetCell canceled tasks.
Logging › Task Activity
In Task Activity, a User or Administrator can track cube view progress and cancel a long-running cube view instead of resetting IIS.
IMPORTANT: Cloud and self-hosted customers can cancel their own long-running cube views and turn on detailed logging to help support troubleshooting.
NOTE: For all non-UI tasks, such as consolidation or other long-running tasks, the task activity icon will start blinking within a few minutes.
Cube View
When running a cube view through data explorer or clicking the refresh icon, if it takes longer than 10 seconds in the OneStream application, a dialog box will display an indeterminate progress bar and the ability to cancel the cube view or close the pop-up dialog through the Cancel Task and Close buttons. If you click the Close button, the dialog box will close, the Task Activity will blink (displaying to you that a task is running in the background), and the report will open when completed. If you click the Cancel Task button, a canceling message displays and the report will not run.
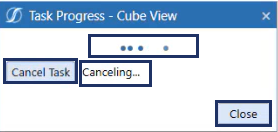
You can also click nothing when the dialog box displays. It will close on its own once the report loads. In Task Activity, the Task Status column displays whether the task was canceled by a User or Administrator. If you are an Administrator, you have the option to show tasks for all users and show running tasks only. You can also can cancel another user's running task. Non-admins have the option to show running tasks only. In Task Activity, the Task Information and Running Task Progress buttons are displayed inline with each record. You can also click Running Task Progress to cancel a task.
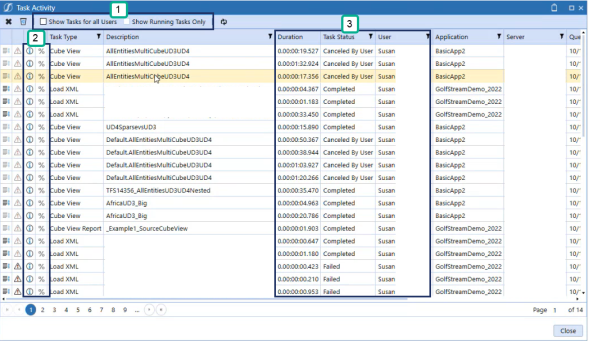
The Task Activity icon will blink when the cube view is taking longer than 10 seconds to complete and you are not in the Task Activity dialog box. The Task Activity icon will not blink if a task activity dialog box is open. Your cursor may spin after clicking the Task Activity icon. There may also be times when the task will complete and the task activity icon continues to blink. This should only last a few seconds or until you perform an action such as clicking in the application.
Show Report
When running a report (Show Report), if it takes longer than 10 seconds in the OneStream application, a dialog box will display an indeterminate progress bar and the ability to cancel the cube view or close the pop-up dialog through the Cancel Task and Close buttons. If you click the Close button, the dialog box will close, the Task Activity will blink (displaying to you that a task is running in the background), and the report will open when completed. If you click the Cancel Task button, a canceling message displays and the report will not run.
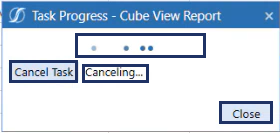
You can also click nothing when the dialog box displays. It will close on its own once the report loads. In Task Activity, the Task Status column displays whether the task was canceled by a User or Administrator. If you are an Administrator, you have the option to show tasks for all users and show running tasks only. You can also can cancel another user's running task. Non-admins have the option to show running tasks only. In Task Activity, the Task Information and Running Task Progress buttons are displayed inline with each record. You can also click Running Task Progress to cancel a task.
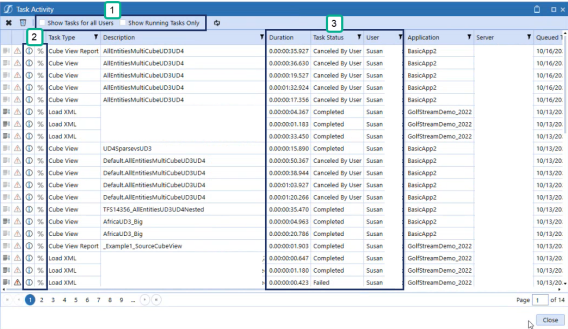
The Task Activity icon will blink when the cube view is taking longer than 10 seconds to complete and you are not in the Task Activity dialog box. The Task Activity icon will not blink if a task activity dialog box is open. Your cursor may spin after clicking the Task Activity icon. There may also be times when the task will complete and the task activity icon continues to blink. This should only last a few seconds or until you perform an action such as clicking in the application.
Export to Excel
When running an Export to Excel, if it takes longer than 10 seconds in the OneStream application, display an indeterminate progress bar and the ability to cancel the cube view or close the pop-up dialog through the Cancel Task and Close buttons. If you select the Close button, the dialog box will close, the Task Activity will blink (displaying to you that a task is running in the background) and the report will open once completed. If you select Cancel Task, a canceling message displays and Excel will not launch.
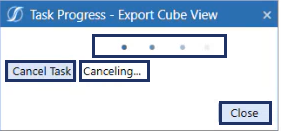
You can also click nothing when the dialog box displays. It will close on its own once the report loads. In Task Activity, the Task Status column displays whether the task was canceled by a User or Administrator. If you are an Administrator, you have the option to show tasks for all users and show running tasks only. You can also can cancel another user's running task. Non-admins have the option to show running tasks only. In Task Activity, the Task Information and Running Task Progress buttons are displayed inline with each record. You can also click Running Task Progress to cancel a task.

The Task Activity icon will blink when the cube view is taking longer than 10 seconds to complete and you are not in the Task Activity dialog box. The Task Activity icon will not blink if a task activity dialog box is open. Your cursor may spin after clicking the Task Activity icon. There may also be times when the task will complete and the task activity icon continues to blink. This should only last a few seconds or until you perform an action such as clicking in the application.
Dashboard with Cube View Components
When running a dashboard with a single cube view component or multiple cube view components, if it takes longer than 10 seconds, you will not see a pop-up dialog box. You must click Task Activity to review all cube views. You also can cancel each individual cube view by clicking the Running Task Progress button to cancel your tasks.
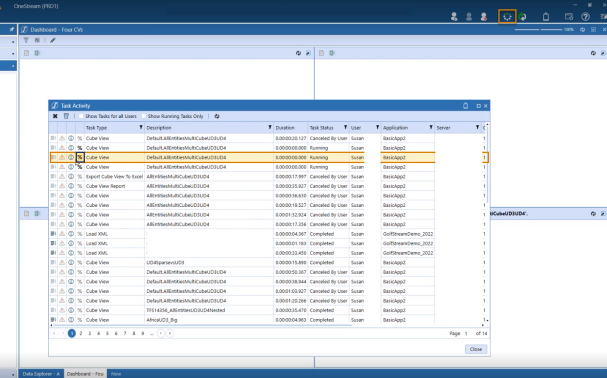
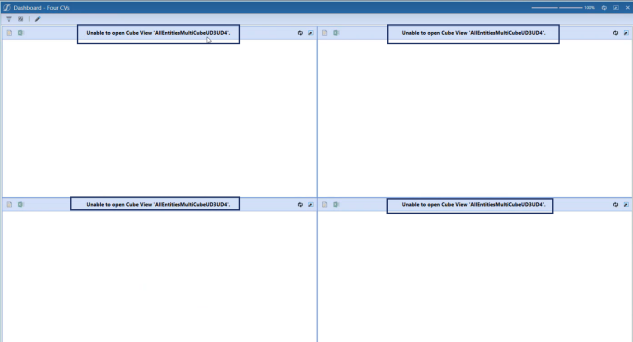
To verify if a cube view has been canceled, a message displays that it cannot open the cube view.
Detailed Logging
Use Detailed Logging has been removed from the App Server Config file, TALogCubeViews from the Task Activity section, and added to individual cube views. This setting can be found in both the Designer and Advanced tabs for Cube Views. It allows you to turn on detailed logging to gather more information about your cube views, such as data cells and any additional information in Task Activity.
-
On the Application tab, under Presentation, click Workspaces.
-
In the Application Workspaces pane, under Workspaces, expand Default > Maintenance Unit > Default > Cube View Groups.
-
Select a cube view under the Cube View Groups to edit.
-
Click the Designer tab and select Common under General settings.
-
For Use Detailed Logging, the default is set to False.
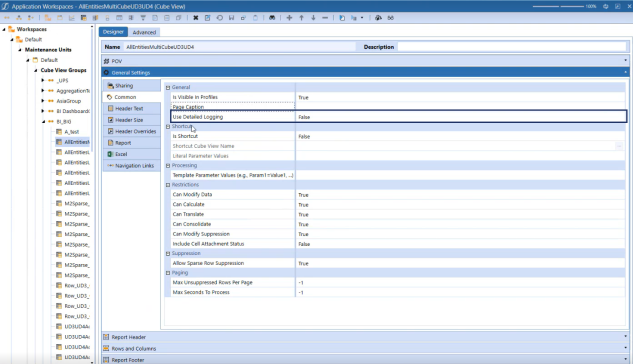
NOTE: When set to True, detailed logging will provide information in Task Activity, such as individual steps and additional information about the cube view.
Logging › Task Activity
You can cancel a long running cube view that contains paging in the Excel Add-in or Spreadsheet. This allows you to cancel a single page using Task Activity instead of waiting for the entire cube view to load and process. A user or admin can cancel the cube view within the Excel Add-in or Spreadsheet by canceling from each page in Task Activity or during the initial load of the cube view.
Paging Controls
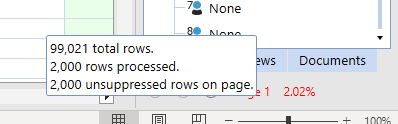
You can navigate between pages by moving forward or back using the arrow keys (first page, previous page, and next page). Each page will display the page number and data loaded in a percentage below the tabs in the right-hand corner.
The paging tool tip shows the number of total rows, rows processed, and unsuppressed rows on a page.
Connect to a Cube View with Paging
You can connect to a cube view with paging within Excel Add-In or OneStream spreadsheet. Any user can use cube view paging in Excel Add-In or Spreadsheet.
-
In the Windows Application, under Tools, click Spreadsheet, click on Cube Views in the OneStream ribbon. In Excel Add-In, under the OneStream ribbon, click Cube Views.
-
Click Cube View Connections to add the cube view connection.
-
When the Cube View Connection dialog box appears, click Add button.
-
In the Cube View connection dialog box, select the ellipses (...) next to the Cube View field.
-
In the Object Lookup, use the search field to search for your Cube View, then select it in the hierarchy. Then click OK.
NOTE: It may take a long time for the parameter dialog to appear for Cube Views containing parameters. You will need to enter or select a specific value after clicking OK and selecting the Cube View.
-
Click Close in Cube View connections dialog.
-
Click in the Cube View, on the right-hand corner, the paging controls will display.
-
You can navigate between pages with the arrow keys and data loaded will display within each page in a percentage.
Load an Excel File with Cube View Paging
You can load an Excel file that contains a Cube View that needs to be paged in Excel Add-In or Spreadsheet.
-
In the Windows Application, under Tools, click Spreadsheet, click on File>Open in the OneStream ribbon. In Excel Add-In, in the ribbon, go to File, click Open.
-
Select a file from your local folder or OneStream File System and click Open.
-
Click the Refresh Sheet button in the OneStream ribbon.
-
The Cube View data will refresh, on the right-hand corner, the paging controls will display.
-
You can navigate between pages with the arrow keys. The percentage of data loaded will be displayed next to the paging controls.
Task Activity: Cancel Cube View with Paging
In Task Activity, a user or administrator can cancel a Cube View in Task Activity within Excel Add-In or Spreadsheet.
-
In the Windows Application, under Tools, click Spreadsheet, click on Cube Views in the OneStream ribbon. In Excel Add-In, under the OneStream ribbon, click Cube Views.
-
Click Cube View Connection and add the Cube View connection.
-
When the Cube View Connection dialog box appears, click Add button.
-
In the Cube View connection dialog box, select the ellipses (...) next to Cube Views.
-
In Object Lookup, select the Cube View from the hierarchy, and click OK.
-
Click Close in Cube View connections dialog.
-
When you click in the Cube View, on the right-hand corner, the paging controls will display. Click the Next Page button.
NOTE: If you click on the paging controls to go to the next page and the load time takes more than 10 seconds, the dialog box will appear allowing you to cancel the Cube View.
-
Click on the Task Activity button and a Cube View task type displays in the Task Activity dialog box.
-
Use the Running Task Progress button to open the Task Progress dialog box.
-
In the Task Progress dialog box, it will display the indeterminate load bar. Use the Cancel Task button to cancel your task.
-
Refresh the Task Activity dialog box. The Task Activity dialog box will display the task status if the user or administrator canceled the task.
NOTE: Canceling the Next Page load for a Cube View/Quick View will display the #REFRESH text in the data cells, rather than the page blank for the Initial Load.
Logging › Task Activity
You can cancel a Quick View with Paging in the Excel Add-In or Spreadsheet. This allows you to cancel the Quick View without having to wait for all pages to load and process on the server. A user or admin can cancel the loading of a Quick View page from the Excel Add-In or Spreadsheet from Task Activity.
NOTE: Previously, Quick View paging controls appeared in the Quick Views tab. It is now located below all three tabs.

Paging Controls
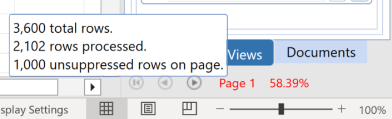
You can navigate between pages by moving forward or back with the arrow keys (first page, previous page, and next page). Each page will display the page number and data loaded in a percentage below the tabs on the right-hand corner.
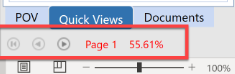
The paging tool tip shows the number of total rows, \ rows processed, and unsuppressed rows on a page.
Create a Quick View with Quick View Paging
You can create a quick view with quick view paging within Excel Add-In or Spreadsheet. Any user can use quick view paging in Excel Add-In or Spreadsheet.
-
In the Windows Application, under Tools, click Spreadsheet, click on Quick Views >Create Quick View option in the OneStream ribbon. In Excel Add-In, under the OneStream ribbon, click Quick Views.
-
Click Create Quick View button in the Quick View pane to create a new quick view.
NOTE: See Create and Modify Quick View for more information.
-
In the Create Quick View dialog, accept the default or insert a specific Name and then click OK.
-
Modify your Quick View to add and remove dimensions and members to set up your Quick View.
NOTE: See Modify Quick View for more information.
-
When making modifications and applying changes, the data will update to reflect all changes.
-
When a Quick View requires paging, the paging controls will display in the right-hand corner.
-
You can navigate between pages with the arrow keys. The percentage of data loaded will be displayed next to the paging controls.
Load an Excel File for Quick View Paging
You can load an Excel file that contains a Quick View with Paging for Excel Add-In or Spreadsheet.
-
In the Windows Application, under Tools, click Spreadsheet, click on File>Open in the OneStream ribbon. In Excel Add-In, in the ribbon, go to File, click Open.
-
Select a file from your local folder and click Open.
-
Click the Refresh Workbook button in the OneStream ribbon.
-
The Worksheet and data will refresh, on the right-hand corner, the paging controls will display.
-
You can navigate between pages with the arrow keys. The percentage of data loaded will be displayed next to the paging controls.
Task Activity: Cancel Quick View Paging
In Task Activity, a user or administrator can cancel a quick view with paging within Excel Add-In or Spreadsheet.
-
In the Windows Application, under Tools, click Spreadsheet, click on Quick Views in the OneStream ribbon. In Excel Add-In, under the OneStream ribbon, click Quick Views.
-
Click Create Quick View button in the Quick View pane to create a new quick view.
NOTE: See Create and Modify Quick View for more information.
-
In the Create Quick View dialog, accept the default or insert a specific Name and click OK.
-
Add or Remove dimensions and members to modify and set up your Quick View.
NOTE: See Modify Quick View for more information.
-
When making modifications and applying changes, the data will update to reflect all changes.
-
When a Quick View requires paging, the paging controls will display in the lower right-hand corner. Click the Next Page button.
-
Click on the Task Activity button and a Quick View task type displays in the Task Activity dialog box.
-
Use the Running Task Progress button to open the Task Progress dialog box.
-
In the Task Progress dialog box, it will display the indeterminate load bar. Use the Cancel Task button to cancel your task.
-
Refresh the Task Activity dialog box. The Task Activity dialog box will display the task status if the user or administrator canceled the task.
NOTE: Canceling the Next Page load for a Cube View/Quick View will display the #REFRESH text in the data cells, rather than the page blank for the Initial Load.
Logging
Administrators can use the following to evaluate errors on System > Logging.
 Clear error log for current user
Clears all logs for a user.
 Clear error log for all users
Clears all logs for all users.
This grid will display:
Description
Displays a brief description of the error.
Error Time
Indicates when the error occurred.
Error Level
Displays the error type such as Unknown, Fatal, Warning etc.
User
Displays the user ID.
Application
Identifies the application a user is logged onto.
Tier
Displays the application tier such as App Server, Web Server or Client.
App Server
Identifies the application server to which a user was connected when they encountered an error.