The Extensible Document Framework integrates OneStream content with Microsoft Office and Text Files. In turn, these documents become known as Extensible Documents. You can create Extensible Documents by selecting the type of document desired, which can be a Microsoft Word Document, Text Editor Document, Excel spreadsheet, OneStream Spreadsheet, PowerPoint presentation, or a text File. Extensible Documents allow you to display any information you want from OneStream, and because it is integrated with these different products, the data stays current and dynamic. For the purpose of this guide, XF Docs can also be referenced as Extensible Documents.
This section describes how to work with Extensible Documents.
Presenting Data With Extensible Documents
The Extensible Document Framework integrates OneStream content with Microsoft Office and Text Files. In turn, these documents become known as Extensible Documents.
You can create extensible documents by first selecting the type of document desired, which can be a Microsoft Word document in Microsoft Word or Text Editor, Excel spreadsheet, OneStream Spreadsheet, PowerPoint presentation, or text file. After selecting the document, use OneStream’s custom parameters, substitution variables, document variables, and retrieve functions to get specific information such as time periods, entity names, data cell values, text comments, and other information. You can also insert images into a Microsoft Word document, Text Editor document, PowerPoint presentation, or Excel spreadsheet for reports, charts, Cube Views, Excel spreadsheets, or PDF files.
After you configure an extensible document, save it as [NameofDocument].xfdoc.ext, where the xfdoc portion of the file name tells OneStream that this is an extensible document (for example, CostSpreadsheet.xfdoc.xlsx) and the .ext portion of the file name tells the type of file it is. Load the document into OneStream’s file share to launch it from OneStream or include it in dashboards or report books.
The value of Extensible Documents are inherently linked to OneStream and eliminate the need for third party integration tools. Upon launching a document, the content is displayed based on the correct parameter values, images, or retrieve function values. Extensible documents allow you to display live data and objects from OneStream, which enables dynamic use and confidence in the information displayed.
Presenting Data With Extensible Documents › Extensible Document Framework
Extensible Document Creation Process
To create an extensible document, begin with the Microsoft document or Text File needed to create the framework. Next, decide the type of data required and insert parameters, images, or retrieve functions needed to pull data from OneStream and dynamically update the extensible document. Once the document is complete, save it as follows (all examples below are using the file name GolfStream Report):
Saving a Word Document
GolfStream Report.xfdoc.docx
Saving an Excel Spreadsheet
GolfStream Report.xfdoc.xlsx
Saving a PowerPoint Presentation
GolfStream Report.xfdoc.pptx
Saving a Text File
GolfStream Report.xfdoc.txt
NOTE: Extensible documents are compatible with Microsoft Office version 2007 and later.
IMPORTANT: When processing Document Variables within the .xfdoc file extension, OneStream will allow you to reload the file and not strip the “.xfdoc” out of the filename.
Once the document is saved in the format mentioned above, upload the document into OneStream’s File Explorer.
Click File Explorer in OneStream to launch the File Explorer dialog box.
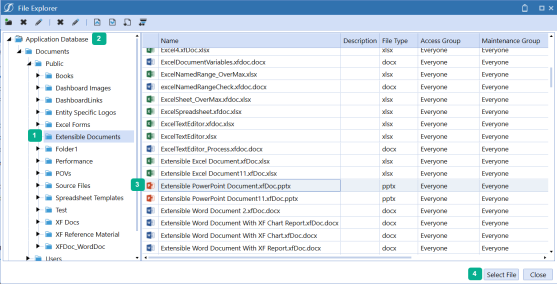
Select the folder in which to save the extensible document.
-
Select the folder in which to save the XF Docs.
-
Upload the document into OneStream.
-
Click on the desired file name.
-
Click Select File to launch the document and see the updated values.
Using Document Variables in Extensible Documents
Document Variables allow you to insert content into a Microsoft Word document or Text Editor as XF Docs. When using this method, you can view the processed OneStream content and edit the document simultaneously for Cube Views, Excel Sheets, Excel Named Ranges, Dashboard Reports, and more.
See Document Variable Setup and Creating an Extensible Document in Text Editor for more information.
Using Parameters and Substitution Variables in Extensible Documents
When creating extensible documents, use parameters as placeholders for OneStream member names, data, or user comments. Place a parameter in different areas of a document where specific information is needed. For example, if the |!MyEntity!| parameter was used in the document’s framework, once it was launched from OneStream, the parameter would be recognized and replaced with the desired entity name.
Some parameters may prompt the user to select a specific entity, account, time period, or other data to view the document correctly. Parameters can be used in any Word document, PowerPoint presentation, Excel spreadsheet, or text file. Any parameter that exists in OneStream can be used in an extensible document. See Parameters for more details.
See the Creating an Extensible Document sections for examples on how to incorporate parameters into an extensible document.
Substitution variables can also be used in Word, Excel, PowerPoint, or a text file. These variables call out details such as an Application Name |AppName|, User Name |UserName|, or refer to a specific POV which creates versatility when reusing the same document. See Substitution Variables for details.
See Creating a Document in Microsoft PowerPoint for an example on how to incorporate substitution variables into an extensible document.
You can preserve formatting if you are inserting a parameter into an Extensible document. This is optional and allows you to include formatting and ensure formatting is preserved during updates. See Parameters in Extensible Documents for more information.
Using Images in Extensible Documents
You can display a variety of reports, charts, Cube Views, Excel spreadsheets, PDFs and rich text in an extensible document. Any one of these items can be used in a Word document, PowerPoint presentation, or Excel spreadsheet.
You can insert any image, right-click on it, and choose the View Alt Text right-click option. In Microsoft Word, this will open the View Alt Text box. In the Alt Text box, you can enter the required Document Variable arguments, referencing the path to the content to display in place of the current image.
After saving the Document Variable argument Alt Text in the image, you must Process and Open the document through the OneStream File Explorer or refresh the OneStream Text Editor or Spreadsheet page to process it. After processing the extensible document, the Document Variable content will replace the image.
For more details on an image’s configuration, refer to the extensible document syntax in the Object Lookup dialog box in OneStream, or see Extensible Document Settings.
See Creating an Extensible Document in Microsoft Word and Extensible Documents with Rich Text Overview for more information.
Using Retrieve Functions in Extensible Documents
You can use retrieve functions such as XFGetCell in Excel. These functions run on the server when launched from OneStream. Log into the Excel Add-In, load a cube view, convert to XFGetCell, then click Refresh Data to display the updated Excel spreadsheet.
You can also create Excel charts based on the retrieve values. These charts display the correct data when you launch the spreadsheet from OneStream. Use the XFGetCellVolatile retrieve function to refresh the Excel chart and display updated data. Excel requires a volatile function for proper refreshing when using charts that reference calculated cells.
See Creating an Extensible Document in Microsoft Excel for an example on how to use retrieve functions with extensible documents.
There is also another type of retrieve function called XFCell which retrieves data from a single cell in OneStream. This is intended for text documents such as Word or PowerPoint. For example, XFCell(A#20500:E#Clubs) returns a value for the account and entity intersection.
Parameters and substitution variables may also be used in an XFCell formula. For example, XFCell(A#20500:E#|!MyEntityParameter!|:T#|Global|) returns a value for the specified account, the entity selected at run-time, and your application's global time period.
You can include additional settings in an XFCell function used within an extensible document to format resulting data (for example, XFCell(A#20500:E#Clubs, Culture=User, NumberFormat=N3, DisplayNoDataAsZero=True, Scale=3, FlipSign=True, ShowPercentSign=False).
NOTE: Any dimensions not specified in the formula come from the current POV.
For more examples and details on XFCell’s syntax, refer to the extensible document Settings in the Object Lookup dialog box in OneStream, or see Extensible Document Settings under Object Lookup in Presenting Data With Books, Cube Views and Dashboards.
See Creating an Extensible Document in Microsoft PowerPoint for an example on how to use XFCell with extensible documents.
Using Rich Text Content Controls
Rich text content controls are used in Microsoft Word only and allow users to add a Cube View, a dashboard report, a Word document (.docx or .xfDoc.docx), a rich text file (.rtf), or a text file (.txt) to any extensible Word document. When the extensible document is launched, the content control is replaced with formatted text that can be edited and reformatted as desired. See Creating an Extensible Document in Microsoft Word for more information.
Presenting Data With Extensible Documents › Extensible Document Framework
You can start in Microsoft Word or OneStream Text Editor to embed a document variable with narrative. When processing your document in OneStream File Explorer, select “Process and Open in Text Editor Page” or "Process and Open" to see the output in Text Editor or Microsoft Word. You can also make any edits or changes to the narrative (non-document variable content) in Text Editor including inserting new text or images.
There are various functions you can use to easily embed refreshable content such as:
Document Variables: Allows you to insert content in a Microsoft Word document or OneStream Text Editor for XF Docs.
Rich Text Functionality: Allows document variables to support rich text functionality and view rich text content in Microsoft Word or OneStream Text Editor.
Show/Hide Field Codes: Allows you to view embedded content while in edit mode by toggling the content to see it processed or unprocessed. This allows you to update Document Variables quickly then refresh the Text Editor page to view updated content instead of navigating to OneStream File Explorer to Process and Open again.
Refresh Content: Allows you to save and refresh your edits directly from the document to see your updates.
MergeFormat: Allows you to preserve document formatting when using Parameters or Substitution Variables.
Document Variable Field
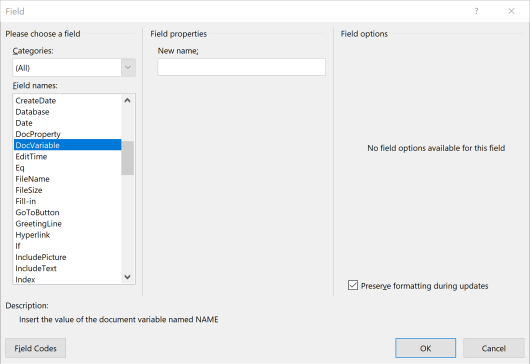
This is the field that allows you to insert extensible content from OneStream objects in Microsoft Word or Text Editor for XF Docs.
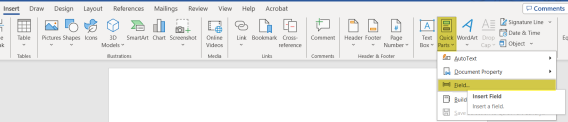
Quick Parts
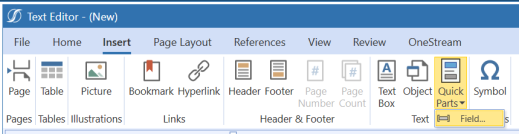
Quick Parts is a Microsoft Word document feature and is available in Text Editor. The concept is similar to how we use Substitution Variables in OneStream.
-
You insert fields into a document that serve as a placeholder for items such as Cube Views Reports, Excel Sheets, Excel Named Ranges, and more.
-
Upon saving, refreshing, and opening the doc, the fields dynamically update and display the desired content.
-
The field attributes and settings determine what, how, and the location of the field controls of where it displays.
Field Code
This function allows you to define the content item and formatting. Within Text Editor, you can use the Show Field Codes and Hide Field Codes buttons under the OneStream Ribbon to show or hide field codes.
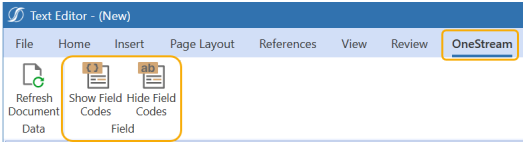
Within a Microsoft Word document, use Toggle (right-click option) in Word for the same result. You can also select the Alt+F9 keys.
TIP: If pressing the Alt+F9 keys does not work, press Alt+Fn+F9 simultaneously instead.
Alt Text
You can edit using the Alt Text functionality in OneStream within Text Editor. This is located under Application> Tools>Text Editor>Format>Alt Text. In Microsoft Word, this is located under Picture Format>Alt Text. Alt Text is disabled for Text Boxes and Objects within Text Editor.
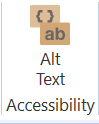
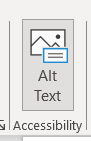
NOTE: In OneStream Text Editor, the Format ribbon will not appear unless an image is selected.
Rich Text Functionality
Document variables support the use of parameters in Microsoft Word or OneStream Text Editor. You can view parameters containing Literal Values equal to rich text format, and which can be referenced in the Document Variable. You can also paste rich text format or plain text to display in the specific Document Variable. Then, you can process and open the XF Docs in Microsoft Word and OneStream Text Editor.
TIP: If the rich text parameter content does not immediately display in Microsoft Word, press the Alt + F9 or Alt + Fn + F9 keys simultaneously to display the processed content.
Refresh Document
You can automatically refresh a document and OneStream will update all the new content and narrative immediately within Text Editor. This allows you to edit, save, and re-process all content quicker in Text Editor.
-
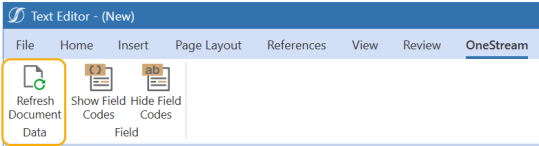
Under the OneStream ribbon within Text Editor, a Refresh Document icon displays.
-
When you click on the Refresh Document icon, the embedded content will be refreshed.
-
When you click on the Refresh Document icon, in a processed XF Doc, you will be prompted with a dialog. The dialog will display "Do you want to save your changes and refresh?"
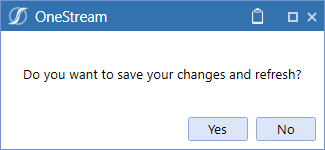
NOTE: If you select Yes, the document will save and re-process. If you select No, it will not save the document or re-process.
Preserve Formatting During Updates
You can preserve formatting if you are inserting a parameter in an XF Doc. This is optional and allows you to include and ensure that formatting will be preserved during updates through MergeFormat.
-
When inserting a document variable within a Microsoft Word or Text Editor, the document variable field dialog appears. There is an option to select Preserve formatting during updates.
NOTE: Within Microsoft Word, it is checked by default.
-
When the Preserve formatting during updates checkbox is selected, it will add the “\*MERGEFORMAT” syntax to the end of the variable.
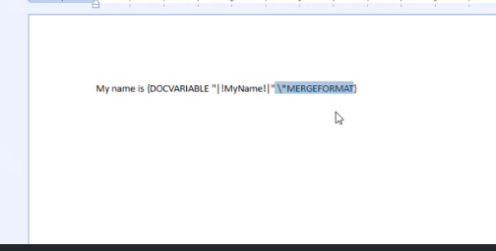
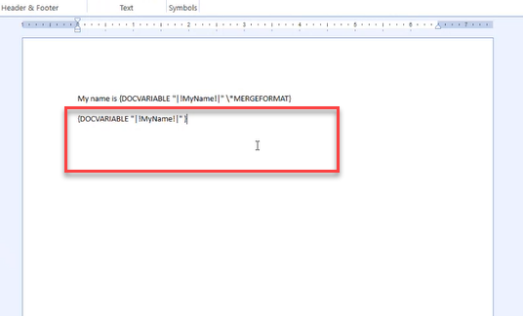
When the Preserve formatting during updates checkbox is not selected, the “\*MERGEFORMAT” syntax will not be added to the end of the variable.
Presenting Data With Extensible Documents › Extensible Document Framework
Using Parameters
You can use parameters and substitution variables as placeholders to enhance extensible documents with selections for time period, entity, data cell values, and more.
In this example, parameters were inserted in places to obtain information from OneStream. The parameters named were created to display the input parameter for the cube view name and entity for this document. When the XF Doc is processed at run-time, it prompts you to select both values.
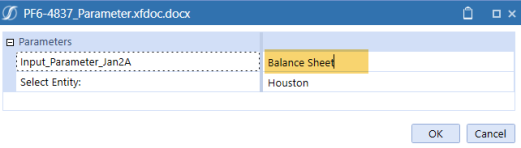
After selecting parameters, the document displays the desired data. Additionally, you can update content on the parameter and add more narrative to an XF Doc. You can inherit the format of a parameter from where it’s being inserted within a paragraph.
For example, you make edits to your XF Docs by making the text red, bold, and font size 18. Within OneStream Text Editor or Microsoft Word, the values display with the associated "Cube View" requested in the Document Variable field and the text entered appears with the correct font, color and boldness. The newly added Income Statement cube view appears in the report and the second value entered into the XF Doc.
“MERGEFORMAT” text can be removed. This simply means, if you insert this in Microsoft Word, it will take the formatting of the previous paragraph or previous range in the paragraph.
Parameter and Substitution Variable Setup in Text Editor
In a new or existing XF Doc:
-
Within Text Editor, navigate to Insert> Quick Parts> Field.
-
Remove all existing syntax between the first set of quotes and everything after.
-
Copy and paste the Parameter or Substitution Variable name with surrounded by quotes; make sure to include standard object syntax.
NOTE: Ensure to include standard object syntax covers the exclamation points and the pipes around the parameter.
-
Enable Preserve formatting during updates.
NOTE: This is an optional setting that will preserve formatting.
-
Click OK.
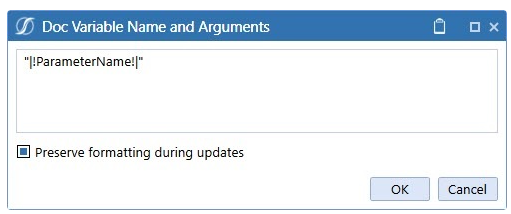

Presenting Data With Extensible Documents › Extensible Document Framework
You can easily embed refreshable content to allow users to edit and narrate a document for the purposes of publishing it into a report. This allows you to embed and refresh content using Document Variables in a Microsoft Word document through the following actions:
NOTE: When inserting content into a Word document, the embedded content takes on the page settings of the main document. To change the page settings for the inserted content, add a section break before the inserted content. After the section break, specify the desired page settings for the embedded content.
IMPORTANT: Copy all syntax needed to insert content using document variables directly from Object Lookup. See Extensible Document Settings.
Presenting Data With Extensible Documents › Extensible Document Framework › Create an Extensible Document in Microsoft Word
NOTE: The same format for inserting an image is used in Microsoft PowerPoint and Excel. Also, for Microsoft upgrade Office version 1804 or higher, Microsoft changed how the Alt Text Title property is stored for embedded images. This impacts the creation of extensible documents in OneStream. Existing extensible documents continue to run as expected. It only impacts newly created extensible documents for version 1804 or higher of Microsoft Office. See the additional following section on this topic.
-
Navigate to the Object Lookup dialog box in OneStream. This dialog box provides all the syntax needed to insert content into an extensible document. This icon can be found on the following pages under the Application tab:
-
Form Templates
-
Books
-
Cube Views
-
Workspaces
-
Data Management
-
-
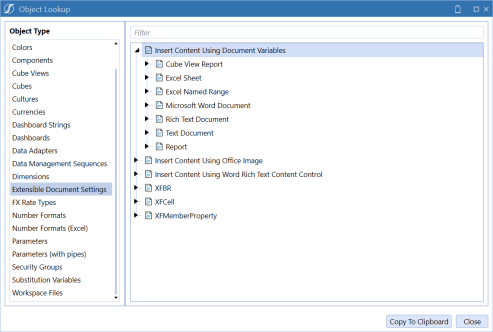
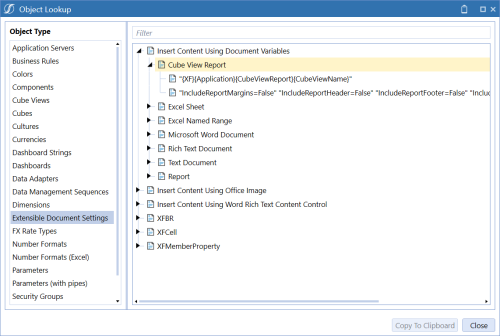
In the dialog box, select Extensible Document Settings. Expand Insert Content Using Document Variables and then expand Cube View Report. Select the line of syntax, and click the Copy to Clipboard button to copy the first string.
-
In Microsoft Word, begin with a new or existing document.
-
To insert your string, go to Insert > Quick Parts > Field.

-
A Field dialog box displays. Under Field Names, select DocVariable. In the New name field, paste the string. The string "{XF}{Application}{CubeViewReport}{CubeViewName}" displays in the field.
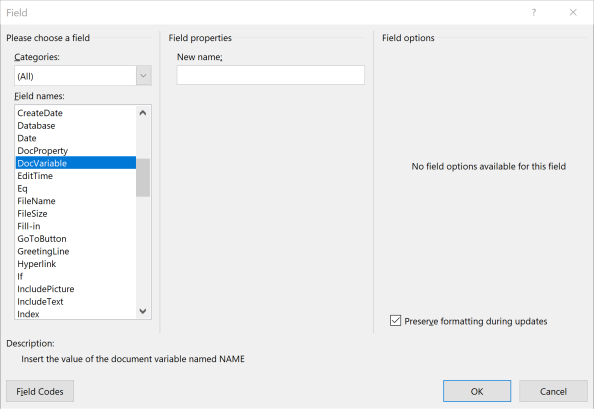
Optional: After the first string in the DocVariable field, you can paste the "IncludeReportMargins=False" arguments. You must separate the arguments by a space. See Extensible Document Settings for more examples on these different item types.
TIP: Under Field Options, ensure Preserve formatting during updates is selected. See Preserve Formatting during Updates for more information.
-
Update the values to reflect the folder structure and the cube view you will add to the report. Then in the Field dialog, click the OK button. The final string will display in the Microsoft Word document: "{DOCVARIABLE}{XF}{Application}{CubeViewReport}{IncomeStatement}".
IMPORTANT: You must manually update and remove extra " (quotation mark) and \ (backslash) symbols, or the Document Variable will not process correctly.
-
Place your cursor on the page, and press the Alt+F9 keys. This allows for the selected value to be shown or hidden on the page.
IMPORTANT: If expected content does not display after clicking the OK button in the Field dialog box, press the Alt+F9 or Alt+Fn+F9 keys.
TIP: If pressing the Alt+F9 keys does not work, press Alt+Fn+F9 simultaneously instead.
-
Select File and Save As. Select a file name and add .xfdoc extension to the name. The file name is appended with ".xfdoc.docx".
-
Click Save to save the file and ensure it is saved in a familiar folder. For example, Documents.
-
Navigate back to OneStream, and open File Explorer. Under the folder of choice, select and upload the file in File Explorer.
-
Right-click on the file and select "Process and Open". You may need to enter or select a parameter and then click OK.
The Cube View Report is now embedded in the extensible Word document.
NOTE: You can insert a Cube View using Microsoft Office Update version 1804 and higher.
TIP: If the Document Variable content is shaded after processing and opening in Microsoft Word, update your settings in File > Options > Advanced > Field shading: Never.
Presenting Data With Extensible Documents › Extensible Document Framework › Create an Extensible Document in Microsoft Word
IMPORTANT: Excel Sheets and Excel Named Ranges must have 500 or fewer rows and 50 or fewer columns. If you include an argument for an Excel Sheet or Excel Named Range that exceeds the maximum limit, you will receive an error message when attempting to process.
-
Navigate to the Object Lookup dialog box in OneStream. This dialog box provides all the syntax needed to insert content into an extensible document. This icon can be found on the following pages under the Application tab:
-
Form Templates
-
Books
-
Cube Views
-
Workspaces
-
Data Management
-
-
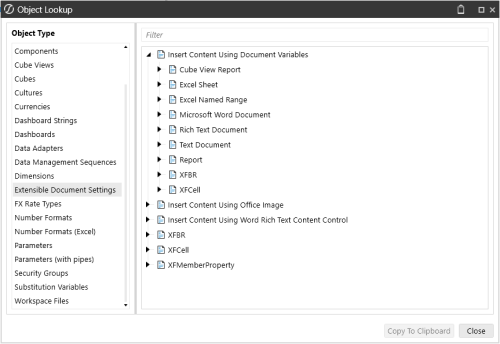
In the dialog box, select Extensible Document Settings. Expand Insert Content Using Document Variables and then expand Excel Named Range. Select the line of syntax, and click the Copy to Clipboard button to copy the first string.
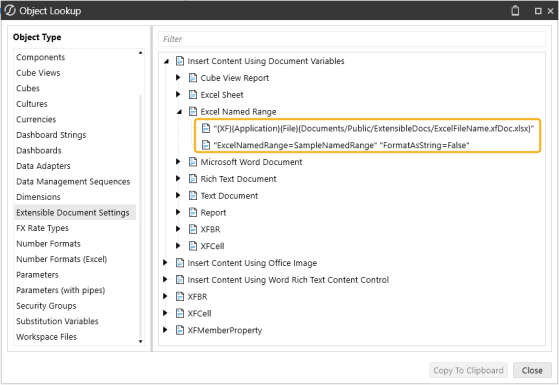
The default value for the FormatAsString parameter is False. When FormatAsString = True, the named range will display as a string instead of a table. If the named range has multiple cells or rows, the cell values will be appended together and each row will display on a new line. If FormatAsString is removed from the document variable, the named range will display as a table as if FormatAsString=False.

-
In Microsoft Word, begin with a new or existing document.
-
To insert your string, go to Insert > Quick Parts > Field.
-
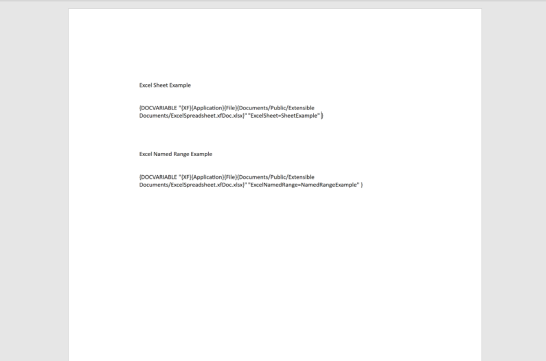
A Field dialog box displays. Under Field Names, select DocVariable. In the New name field, paste the string. The string "{XF}{Application}{File}{Documents/Public/ExtensibleDocs/ExcelFileName.xfDoc.xlsx}" displays in the field.
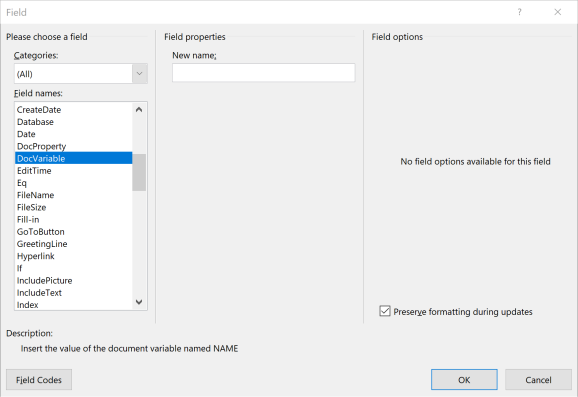
Optional: After the first string in the DocVariable field, you can paste the "ExcelSheet=Sheet1" or "ExcelNamedRange=SampleNamedRange" arguments. You must separate the arguments by a space. See Extensible Document Settings for more examples on these different item types.
TIP: Under Field Options, ensure Preserve formatting during updates is selected. See Preserve formatting during updates for more information.
-
Update the values to reflect the folder structure and Excel path. Then in the Field dialog, click the OK button. The final string will display in the Microsoft Word document: {DOCVARIABLE "{XF}{Application}{File}{Documents/Public/Extensible Documents/Excel4.xfDoc.xlsx}"ExcelSheet=Sheet2"}
IMPORTANT: You must manually update and remove extra " (quotation mark) and \ (backslash) symbols, or the Document Variable will not process correctly.
-
Place your cursor on the page, and press the Alt+F9 keys. This allows for the selected value to be shown or hidden on the page.
IMPORTANT: If the expected content does not display after clicking the OK button in the Field dialog box, press the Alt+F9 or Alt+Fn+F9 keys.
TIP: If pressing the Alt+F9 keys does not work, press Alt+Fn+F9 simultaneously instead.
-
Select File and Save As. Select a file name and add .xfdoc extension to the name. The file name is appended with ".xfdoc.docx".
-
Click Save to save the file and ensure it is saved in a familiar folder. For example, Documents).
-
Navigate back to OneStream, and open File Explorer. Under the folder of choice, select and upload the file in File Explorer.
-
Right-click on the file and select "Process and Open". You may need to enter or select a parameter and then click OK.
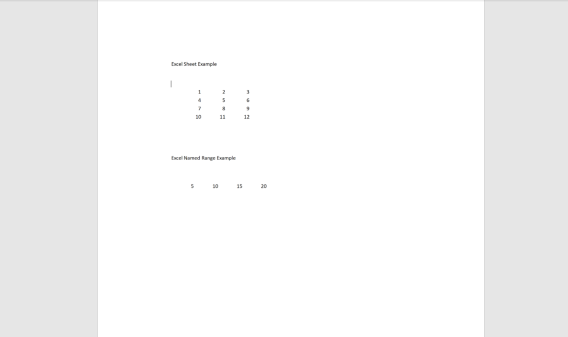
The Microsoft Word document displays the data being requested by the Excel Sheet or Excel Named Range.
TIP: If the Document Variable content is shaded after processing and opening in Microsoft Word, update your settings in File > Options > Advanced > Field shading: Never.
Presenting Data With Extensible Documents › Extensible Document Framework › Create an Extensible Document in Microsoft Word
-
Navigate to the Object Lookup dialog box in OneStream. This dialog box provides all the syntax needed to insert content into an extensible document. This icon can be found on the following pages under the Application tab:
-
Form Templates
-
Books
-
Cube Views
-
Workspaces
-
Data Management
-
-
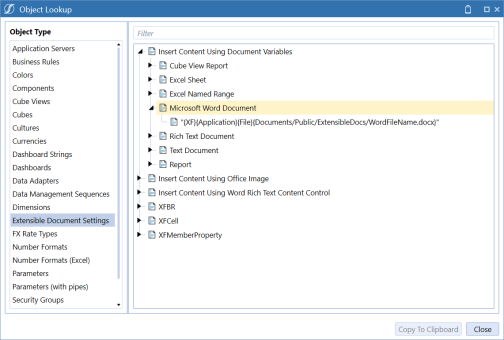
In the dialog box, select Extensible Document Settings. Expand Insert Content Using Document Variables and then expand Microsoft Word Document. Select the line of syntax, and click the Copy to Clipboard button to copy the first string.
-
In Microsoft Word, begin with a new or existing document.
-
To insert your string, go to Insert > Quick Parts > Field.
-
A Field dialog box displays. Under Field Names, select DocVariable. In the New name field, paste the string. The string "{XF}{Application}{File}{Documents/Public/ExtensibleDocs/WordFileName.docx}" displays in the field.
See Extensible Document Settings for more examples on these different item types.
TIP: Under Field Options, ensure Preserve formatting during updates is selected. See Preserve Formatting during Updates for more information.
-
Update the values to reflect the folder structure and the Microsoft Word Document you want to include in the report. Then in the Field dialog, click the OK button. The final string will display in the Microsoft Word document: { DOCVARIABLE \"{XF}{Application{File}{Documents/Public/ExtensibleDocs/WordFileName.docx}\" \* MERGEFORMAT }.
IMPORTANT: You must manually update and remove extra " (quotation mark) and \ (backslash) symbols, or the Document Variable will not process correctly.
-
Place your cursor on the page, and press the Alt+F9 keys. This allows for the selected value to be shown or hidden on the page.
IMPORTANT: If the expected content does not display after clicking the OK button in the Field dialog box, press the Alt+F9 or Alt+Fn+F9 keys.
TIP: If pressing the Alt+F9 keys does not work, press Alt+Fn+F9 simultaneously instead.
-
Select File and Save As. Select a file name and add .xfdoc extension to the name. The file name is appended with ".xfdoc.docx".
-
Click Save to save the file and ensure it is saved in a familiar folder. For example, Documents.
-
Navigate back to OneStream, and open File Explorer. Under the folder of choice, select and upload the file in File Explorer.
-
Right-click on the file and select "Process and Open". You may need to enter or select a parameter and then click OK.
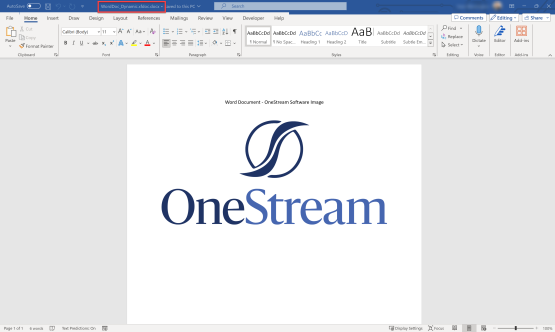
The Microsoft Word document displays the data being requested from the referenced Microsoft Word Document.
TIP: If the Document Variable content is shaded after processing and opening in Microsoft Word, update your settings in File > Options > Advanced > Field shading: Never.
Presenting Data With Extensible Documents › Extensible Document Framework › Create an Extensible Document in Microsoft Word
-
Navigate to the Object Lookup dialog box in OneStream. This dialog box provides all the syntax needed to insert content into an extensible document. This icon can be found on the following pages under the Application tab:
-
Form Templates
-
Books
-
Cube Views
-
Workspaces
-
Data Management
-
-
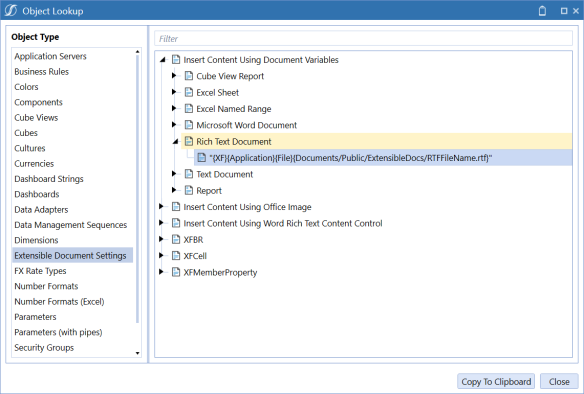
In the dialog box, select Extensible Document Settings. Expand Insert Content Using Document Variables and then expand Rich Text Document. Select the line of syntax and click the Copy to Clipboard button to copy the string.
-
In Microsoft Word, begin with a new or existing document.
-
To insert your string, go to Insert > Quick Parts > Field.
-
A Field dialog box displays. Under Field Names, select DocVariable. In the New name field, paste the string. The string "{XF}{Application}{File}{Documents/Public/ExtensibleDocs/RTFFileName.rtf}" displays in the field. See Extensible Document Settings for more examples on these different item types.
TIP: Under Field Options, ensure Preserve formatting during updates is selected. See Preserve Formatting during Updates for more information.
-
Update the values to reflect the folder structure and the rich text document path. Then in the Field dialog, click the OK button. The final string will display in the Microsoft Word document: {DOCVARIABLE"{XF}{Application}{File}{Documents/Public/Extensible Documents/RichTextFormatDoc.rtf}"}
IMPORTANT: You must manually update and remove the \ (backslash) symbols, or the Document Variable will not process correctly.
-
Place your cursor on the page, and press the Alt+F9 keys. This allows for the selected value to be shown or hidden on the page.
IMPORTANT: If the expected content does not display after clicking the OK button in the Field dialog box, press the Alt+F9 or Alt+Fn+F9 keys.
TIP: If pressing the Alt+F9 keys does not work, press Alt+Fn+F9 simultaneously instead.
-
Select File and Save As. Select a file name and add .xfdoc extension to the name. The file name is appended with ".xfdoc.docx".
-
Click Save to save the file and ensure it is saved in a familiar folder. For example, Documents.
-
Navigate back to OneStream, and open File Explorer. Under the folder of choice, select and upload the file in File Explorer.
-
Right-click on the file and select "Process and Open". You may need to enter or select a parameter and then click OK.
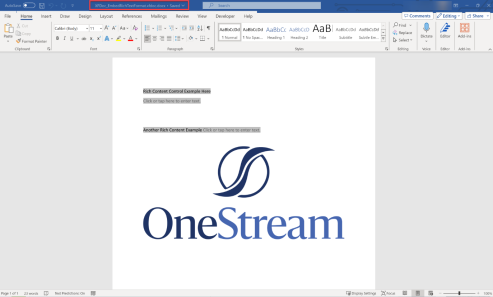
The Microsoft Word document displays the data being requested for the Rich Text Document.
TIP: If the Document Variable content is shaded after processing and opening in Microsoft Word, update your settings in File > Options > Advanced > Field shading: Never.
Presenting Data With Extensible Documents › Extensible Document Framework › Create an Extensible Document in Microsoft Word
-
Navigate to the Object Lookup dialog box in OneStream. This dialog box provides all the syntax needed to insert content into an extensible document. This icon can be found on the following pages under the Application tab:
-
Form Templates
-
Books
-
Cube Views
-
Workspaces
-
Data Management
-
-
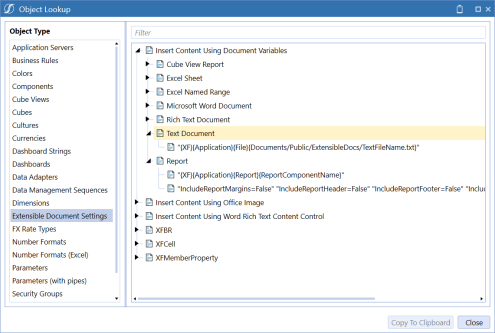
In the dialog box, select Extensible Document Settings. Expand Insert Content Using Document Variables and then expand Text Document. Select the line of syntax and click the Copy to Clipboard button to copy the string.
-
In Microsoft Word, begin with a new or existing document.
-
To insert your string, go to Insert > Quick Parts > Field.
-
A Field dialog box displays. Under Field Names, select DocVariable. In the New name field, paste the string. The string "{XF}{Application}{File}{Documents/Public/ExtensibleDocs/TextFileName.txt}" displays in the field.
See Extensible Document Settings for more examples on these different item types.
TIP: Under Field Options, ensure Preserve formatting during updates is selected. See Preserve Formatting during Updates for more information.
-
Update the values to reflect the folder structure and text file path. Then in the Field dialog, click the OK button. The final string will display in the Microsoft Word document: {DOCVARIABLE "{XF}{Application}{File}{Documents/Public/Extensible Documents/Testtoupdate.txt}"}
IMPORTANT: You must manually update and remove the \ (backslash) symbols, or the Document Variable will not process correctly.
-
Place your cursor on the page, and press the Alt+F9 keys. This allows for the selected value to be shown or hidden on the page.
IMPORTANT: If the expected content does not display after clicking the OK button in the Field dialog box, press the Alt+F9 or Alt+Fn+F9 keys.
TIP: If pressing the Alt+F9 keys does not work, press Alt+Fn+F9 simultaneously instead.
-
Select File and Save As. Select a file name and add .xfdoc extension to the name. The file name is appended with ".xfdoc.docx".
-
Click Save to save the file and ensure it is saved in a familiar folder. For example, Documents.
-
Navigate back to OneStream, and open File Explorer. Under the folder of choice, select and upload the file in File Explorer.
-
Right-click on the file and select "Process and Open". You may need to enter or select a parameter and click OK.
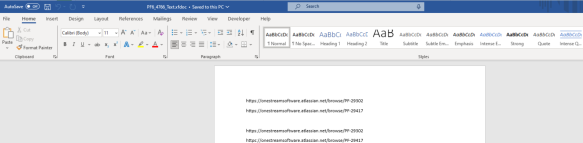
The Microsoft Word document displays the data being requested from the Text File content.
TIP: If the Document Variable content is shaded after processing and opening in Microsoft Word, update your settings in File > Options > Advanced > Field shading: Never.
Presenting Data With Extensible Documents › Extensible Document Framework › Create an Extensible Document in Microsoft Word
-
Navigate to the Object Lookup dialog box in OneStream. This dialog box provides all the syntax needed to insert content into an extensible document. This icon can be found on the following pages under the Application tab:
-
Form Templates
-
Books
-
Cube Views
-
Workspaces
-
Data Management
-
-
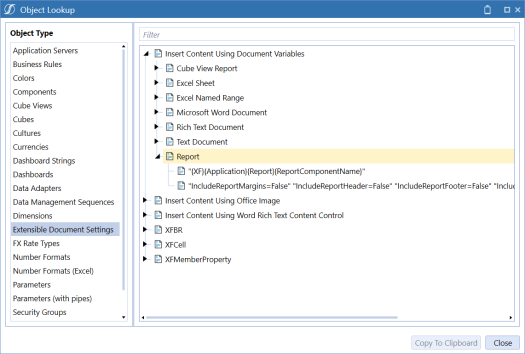
In the dialog box, select Extensible Document Settings. Expand Insert Content Using Document Variables and then expand Report. Select the line of syntax, and click the Copy to Clipboard button to copy the first string.
-
In Microsoft Word, begin with a blank or existing document.
-
To insert your string, go to Insert > Quick Parts > Field.
-
A Field dialog box displays. Under Field Names, select DocVariable. In the New name field, paste the string. The string "{XF}{Application}{Report}{ReportComponentName}" displays in the field.
Optional: After the first string in the DocVariable field, you can paste the "IncludeReportMargins=False" arguments. You must separate the arguments by a space. See Extensible Document Settingsfor more examples on these different item types.
TIP: Under Field Options, ensure Preserve formatting during updates is selected. See Preserve Formatting during Updates for more information.
-
Update the values to reflect the report component name. Then in the Field dialog, click the OK button. The final string will display in the Microsoft Word document: {DOCVARIABLE "{XF}{Application}{Report}{Report3}"}
IMPORTANT: You must manually update and remove the \ (backslash) symbols, or the Document Variable will not process correctly.
-
Place your cursor on the page, and press the Alt+F9 keys. This allows for the selected value to be shown or hidden on the page.
IMPORTANT: If the expected content does not display after clicking the OK button in the Field dialog box, press the Alt+F9 or Alt+Fn+F9 keys.
TIP: If pressing the Alt+F9 keys does not work, press Alt+Fn+F9 simultaneously instead.
-
Select File and Save As. Select a file name and add .xfdoc extension to the name. The file name is appended with ".xfdoc.docx".
-
Click Save to save the file and ensure it is saved in a familiar folder. For example, Documents.
-
Navigate back to OneStream, and open File Explorer. Under the folder of choice, select and upload the file in File Explorer.
-
Right-click on the file and select "Process and Open". You may need to enter or select a parameter and click OK.
The Microsoft Word document displays the embedded report.
TIP: If the Document Variable content is shaded after processing and opening in Microsoft Word, update your settings in File > Options > Advanced > Field shading: Never.
Presenting Data With Extensible Documents › Extensible Document Framework
You can easily embed refreshable content to allow users to edit and narrate a document for the purposes of publishing it into a report. This allows you to embed and refresh content using Document Variables within Text Editor through the following actions:
-
Insert a Report in Text Editor
NOTE: Text Editor contains the OneStream ribbon. See Text Editor Ribbon for more information.
IMPORTANT: Copy all syntax needed to insert content using document variables directly from Object Lookup dialog box. See Extensible Document Settings .
Presenting Data With Extensible Documents › Extensible Document Framework › Creating an Extensible Document in Text Editor
-
Navigate to the Object Lookup dialog box in OneStream. This dialog box provides all the syntax needed to insert content into an extensible document. This icon can be found on the following pages under the Application tab:
-
Form Templates
-
Books
-
Cube Views
-
Workspaces
-
Data Management
-
-
Once in the dialog box, select Extensible Document Settings. Expand Insert Content Using Document Variables and then expand Cube View Report. Select the line of syntax and click Copy to Clipboard to copy the first string.
-
In the Windows Application, under Tools, click Text Editor. Begin with a new or existing file in Text Editor.
-
To inset your string, go to Insert>Quick Parts> Field.
-
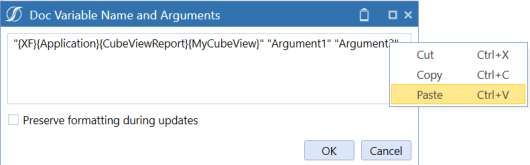
A Doc Variable Name and Arguments dialog box appears. Highlight the placeholder text and paste the copied syntax. The string "{XF}{Application}{CubeViewReport}{CubeViewName}" displays in the field.
Optional: Cube View report arguments, such as "IncludeReportMargins=False", can be pasted in "Argument1" "Argument2" sections. See Extensible Document Settings for more examples on these different item types.
TIP: Under Field Options, preserve formatting during updates is unchecked. See Preserve Formatting during Updates for more information.
-
Update the values to reflect the cube view you will add to the report. Then in the Field dialog, click the OK button. The final string will display in Text Editor: {DOCVARIABLE "{XF}{Application}{CubeViewReport}{IncomeStatement}.
-
Place your cursor on the page and press the Alt+F9 keys. This allows for the selected value to be shown or hidden on the page. You can also use the Show Field Codes and Hide Field Codes buttons under the OneStream Ribbon to show or hide field codes such as Document Variables.
TIP: If pressing Alt+F9 keys does not work, press Alt+Fn+F9 simultaneously instead.
-
Select File and Save As and select Save As File in OneStream File System. Select a specific folder in the File Explorer, then enter a File Name and add the .xfdoc extension. The file name is appended with ".xfdoc.docx".
-
In the OneStream ribbon, click the Refresh Document toolbar button.
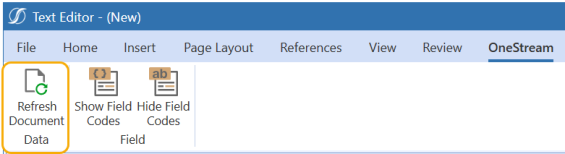
The Text Editor page refreshes and the embedded Cube View report is displayed.
Presenting Data With Extensible Documents › Extensible Document Framework › Creating an Extensible Document in Text Editor
IMPORTANT: Excel Sheets and Excel Named Ranges can only have 500 or less rows and 50 or less columns. If you include an Argument for an Excel Sheet or Excel Named Range that exceeds the maximum limit, you will receive an error message when attempting to process.
-
Navigate to the Object Lookup dialog box in OneStream. This dialog box provides all the syntax needed to insert content into an extensible document. This icon can be found on the following pages under the Application tab:
-
Form Templates
-
Books
-
Cube Views
-
Workspaces
-
Data Management
-
-
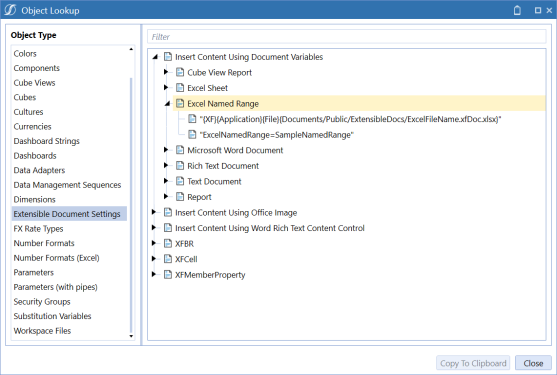
Once in the dialog box, select Extensible Document Settings. Expand Insert Content Using Document Variables and then expand Excel Name Ranged. Select the line of syntax and click Copy to Clipboard to copy the first string.
-
In the Windows Application, under Tools, click Text Editor. Begin with a new or existing file in Text Editor.
-
To inset your string, go to Insert>Quick Parts> Field.
-
A Doc Variable Name and Arguments dialog box appears. Highlight the placeholder text and paste the copied syntax. The string "{XF}{Application}{File}{Documents/Public/ExtensibleDocs/ExcelFileName.xfDoc.xlsx}" displays in the field.
Optional: The "ExcelSheet=Sheet1" or "ExcelNamedRange=SampleNamedRange" arguments can be pasted in "Argument1" "Argument2" sections. See Extensible Document Settings for more examples on these different item types.
TIP: Under Field Options, preserve formatting during updates is unchecked. See Preserve Formatting during Updates for more information.
-
Update the values to reflect the folder structure and excel file path. Then in the Field dialog, click the OK button. The final string will display in Text Editor: {DOCVARIABLE "{XF}{Application}{File}{Documents/Public/Extensible Documents/ExcelTextEditor.xfDoc.xlsx}" "ExcelSheet=Sheet2"
-
Place your cursor on the page and press the Alt+F9 keys. This allows for the selected value to be shown or hidden on the page. You can also use the Show Field Codes and Hide Field Codes buttons under the OneStream Ribbon to show or hide field codes such as Document Variables.
TIP: If pressing ALT+F9 keys does not work, press ALT+Fn+F9 simultaneously instead.
-
Select File and Save As and select Save As File in OneStream File System. Select a specific folder in the File Explorer, then enter a File Name and add .xfdoc extension. The file name is appended with ".xfdoc.docx".
-
In the OneStream ribbon, click the Refresh Document toolbar button.
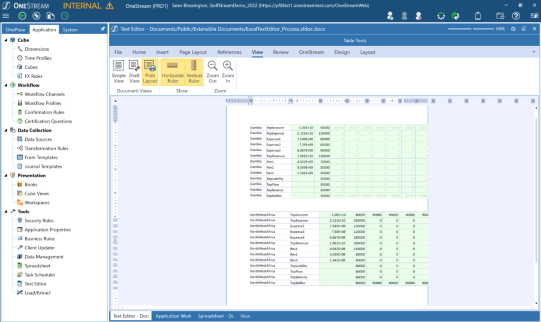
The Text Editor page refreshes and you see the Excel Sheet or Excel Named Range content displayed in place of the Document Variables.
Presenting Data With Extensible Documents › Extensible Document Framework › Creating an Extensible Document in Text Editor
-
Navigate to the Object Lookup dialog box in OneStream. This dialog box provides all the syntax needed to insert content into an extensible document. This icon can be found on the following pages under the Application tab:
-
Form Templates
-
Books
-
Cube Views
-
Workspaces
-
Data Management
-
-
Once in the dialog box, select Extensible Document Settings. Expand Insert Content Using Document Variables and expand Microsoft Word Document. Select the line of syntax and click Copy to Clipboard to copy the string.
-
In the Windows Application, under Tools, click Text Editor. Begin with a new or existing file in Text Editor.
-
To inset your string, go to Insert>Quick Parts> Field.
-
A Doc Variable Name and Arguments dialog box appears. Highlight the placeholder text and paste the copied syntax. The string "{XF}{Application}{File}{Documents/Public/ExtensibleDocs/WordFileName.docx}" displays in the field.
See Extensible Document Settings for more examples on these different item types.
TIP: Under Field Options, preserve formatting during updates is unchecked. See Preserve Formatting during Updates for more information.
-
Update the values to reflect the folder structure and the word document path. Then in the Field dialog, click the OK button. The final string will display in Text Editor: {DOCVARIABLE "{XF}{Application}{File}{Documents/Public/Extensible Documents/OneStreamWordDocument.docx}"}.
-
Place your cursor on the page and press the Alt+F9 keys. This allows for the selected value to be shown or hidden on the page. You can also use the Show Field Codes and Hide Field Codes buttons under the OneStream Ribbon to show or hide field codes such as Document Variables.
TIP: If pressing Alt+F9 keys does not work, press Alt+Fn+F9 simultaneously instead.
-
Select File and Save As and select Save As File in OneStream File System. Select a specific folder in the File Explorer, then enter a Name and add .xfdoc extension. The file name is appended with ".xfdoc.docx".
-
In the OneStream ribbon, click the Refresh Document toolbar button.
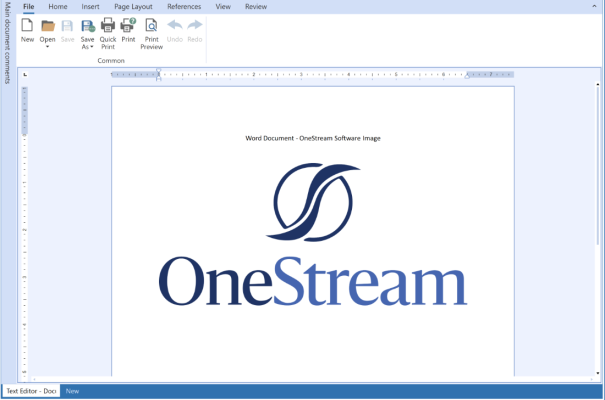
The Text Editor page refreshes and you see the embedded Microsoft Word document.
Presenting Data With Extensible Documents › Extensible Document Framework › Creating an Extensible Document in Text Editor
-
Navigate to the Object Lookup dialog box in OneStream. This dialog box provides all the syntax needed to insert any type of content into an extensible document. This icon can be found on the following pages under the Application tab:
-
Form Templates
-
Books
-
Cube Views
-
Workspaces
-
Data Management
-
-
Once in the dialog box, select Extensible Document Settings. Expand Insert Content Using Document Variables and then expand Rich Text Document. Select the line of syntax and click Copy to Clipboard to copy the string.
-
In the Windows Application, under Tools, click Text Editor. Begin with a new or existing file in Text Editor.
-
To inset your string, go to Insert>Quick Parts> Field.
-
A Doc Variable Name and Arguments dialog box appears. Highlight the placeholder text and paste the copied syntax. The string "{XF}{Application}{File}{Documents/Public/ExtensibleDocs/RTFFileName.rtf}" displays in the field.
See Extensible Document Settings for more examples on these different item types.
TIP: Under Field Options, preserve formatting during updates is unchecked. See Preserve Formatting during Updates for more information.
-
Update the values to reflect the rich text format file path. Then in the Field dialog, click the OK button. The final string will display in Text Editor: {DOCVARIABLE "{XF}{Application}{File}{Documents/Public/Extensible Documents/RichTextFormatDoc.rtf}"}
-
Place your cursor on the page and press the Alt+F9 keys. This allows for the selected value to be shown or hidden on the page. You can also use the Show Field Codes and Hide Field Codes buttons under the OneStream Ribbon to show or hide field codes such as Document Variables.
TIP: If pressing Alt+F9 keys does not work, press Alt+Fn+F9 simultaneously instead.
-
Select File and Save As and select Save As File in OneStream File System. Select a specific folder in the File Explorer, then enter a File Name and add .xfdoc extension. The file name is appended with ".xfdoc.docx".
-
In the OneStream ribbon, click the Refresh Document toolbar button.
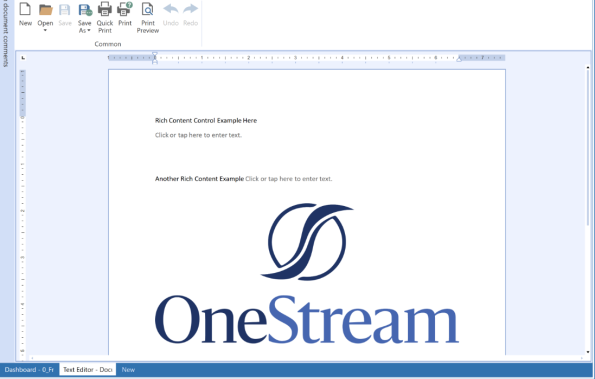
The Text Editor page refreshes and you see the embedded Rich Text Document.
Presenting Data With Extensible Documents › Extensible Document Framework › Creating an Extensible Document in Text Editor
-
Navigate to the Object Lookup dialog box in OneStream. This dialog box provides all the syntax needed to insert content into an extensible document. This icon can be found on the following pages under the Application tab:
-
Form Templates
-
Books
-
Cube Views
-
Workspaces
-
Data Management
-
-
Once in the dialog box, select Extensible Document Settings. Expand Insert Content using Document Variables and then expand Text Document. Select the line of syntax and click Copy to Clipboard to copy the string.
-
In the Windows Application, under Tools, click Text Editor. Begin with a new or existing file in Text Editor.
-
To inset your string, go to Insert>Quick Parts> Field.
-
A Doc Variable Name and Arguments dialog box appears. Highlight the placeholder text and paste the copied syntax. The string "{XF}{Application}{File}{Documents/Public/ExtensibleDocs/TextFileName.txt}" displays in the field.
See Extensible Document Settings for more examples on these different item types.
TIP: Under Field Options, preserve formatting during updates is unchecked. See Preserve Formatting during Updates for more information.
-
Update the values to reflect the folder structure and the text document path. Then in the Field dialog, click the OK button. The final string will display in Text Editor: {DOCVARIABLE "{XF}{Application}{File}{Documents/Public/Extensible Documents/Testtoupdate.txt}"}
-
Place your cursor on the page and press the Alt+F9 keys. This allows for the selected value to be shown or hidden on the page. You can also use the Show Field Codes and Hide Field Codes buttons under the OneStream Ribbon to show or hide field codes such as Document Variables.
TIP: If pressing Alt+F9 keys does not work, press Alt+Fn+F9 simultaneously instead.
-
Select File and Save As and select Save As File in OneStream File System. Select a specific folder in the File Explorer, then enter a Name and add .xfdoc extension. The file name is appended with ".xfdoc.docx".
-
In the OneStream ribbon, click the Refresh Document toolbar button.
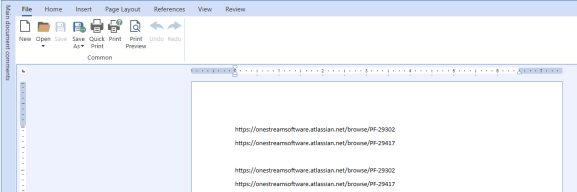
The Text Editor page refreshes and you see the embedded text document.
Presenting Data With Extensible Documents › Extensible Document Framework › Creating an Extensible Document in Text Editor
-
Navigate to the Object Lookup dialog box in OneStream. This dialog box provides all the syntax needed to insert content into an extensible document. This icon can be found on the following pages under the Application tab:
-
Form Templates
-
Books
-
Cube Views
-
Workspaces
-
Data Management
-
-
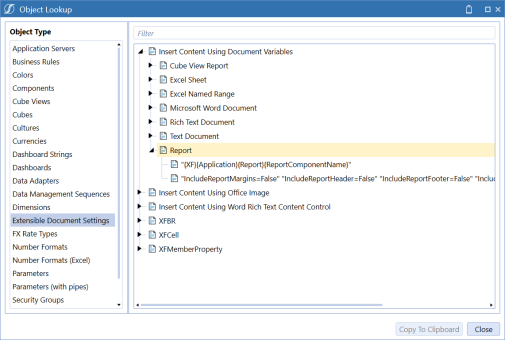
Once in the dialog box, select Extensible Document Settings. Expand Insert Content using Document Variables and then expand Report. Select the line of syntax and click Copy to Clipboard to copy the first string.
-
In the Windows Application, under Tools, click Text Editor. Begin with a new or existing file in Text Editor.
-
To inset your string, go to Insert>Quick Parts> Field.
-
A Doc Variable Name and Arguments dialog box appears. Highlight the placeholder text and paste the copied syntax. The string "{XF}{Application}{Report}{ReportComponentName}" displays in the field.
Optional: Report arguments, such as "IncludeReportMargins=False", can be pasted in "Argument1" "Argument2" sections. See Extensible Document Settings for more examples on these different item types.
TIP: Under Field Options, preserve formatting during updates is unchecked. See Preserve Formatting during Updates for more information.
-
Update the values to reflect the report you will add. Then in the Field dialog, click the OK button. The final string will display in Text Editor: {DOCVARIABLE "{XF}{Application}{Report}{Report3}"}
-
Place your cursor on the page and press the Alt+F9 keys. This allows for the selected value to be shown or hidden on the page. You can also use the Show Field Codes and Hide Field Codes buttons under the OneStream Ribbon to show or hide field codes such as Document Variables.
TIP: If pressing Alt+F9 keys does not work, press Alt+Fn+F9 simultaneously instead.
-
Select File and Save As and select Save As File in OneStream File System. Select a specific folder in the File Explorer, then enter a File Name and add .xfdoc extension. The file name is appended with ".xfdoc.docx".
-
In the OneStream ribbon, click the Refresh Document toolbar button.
The Text Editor page refreshes and you see the embedded report.
Presenting Data With Extensible Documents › Extensible Document Framework
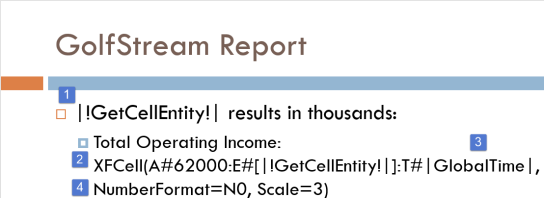
The example below is a slide from a management presentation. It shows how to complete the following:
-
Use parameters
-
Use substitution variables
-
Use the XFCell retrieve function
NOTE: The same format for XFCell is used in Microsoft Word and text files.
-
A parameter named |!GetCellEntity!| is created to select a specific entity on which to base the data. When the extensible document is processed at run-time, it prompts to select the desired entity.
-
XFCell retrieves data from a single cell in OneStream. The example above retrieves data from Account 62000 for the entity selected at run-time, for the application’s global time period.
NOTE: See Extensible Document Settings for more details on XFCell syntax. You can also copy and paste XFCell syntax from a Cube View’s Cell POV Information dialog box into a text file. See Cell POV Information in Using OnePlace Cube Views for more details on this feature.
-
A substitution variable calls the OneStream application's global time, which updates with the Global Time Period is currently set in the application.
-
Additional format settings can be included to control options such as number formatting or scaling.
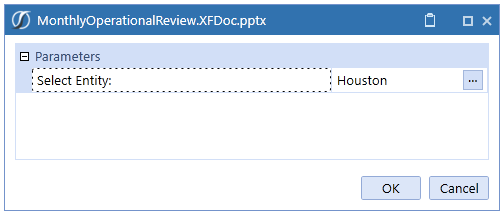
When the document is processed, it prompts to select an entity.
It then displays the updated data for the selected entity.
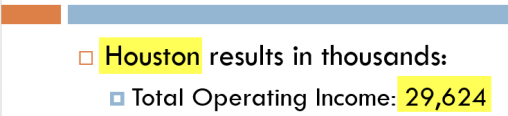
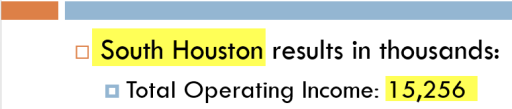
In this example, Houston has now replaced the parameter, and 29,624 is the XFCell function result. Data refreshes and updates when you select a different entity.
Presenting Data With Extensible Documents › Extensible Document Framework
The example below is a summary balance sheet built in Excel. It shows how to:
-
Use a parameter
-
Use the XFGetCellVolatile retrieve function.
-
Use the Excel IF function.
-
Incorporate an Excel chart derived from the functions in an Excel spreadsheet.
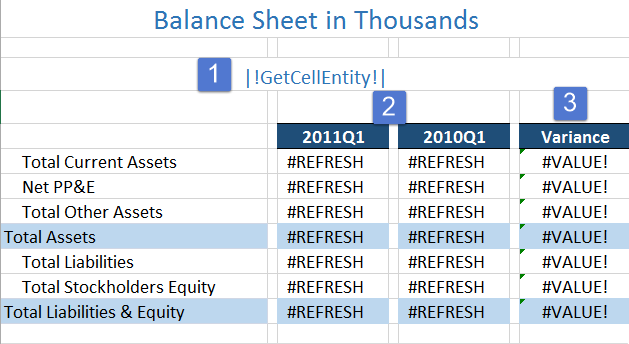
In this example:
-
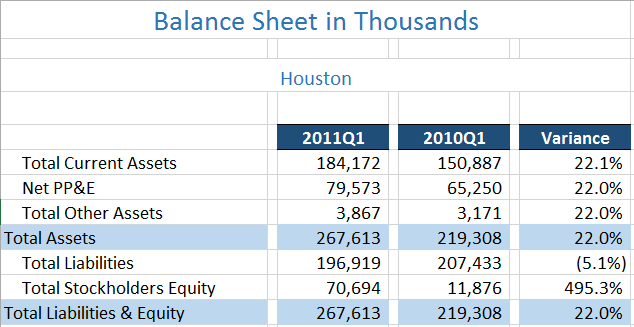
A parameter named |!GetCellEntity!| was created in order to allow the user to select a specific entity on which to base the data for this spreadsheet. When the extensible document processes at run-time, it prompts to select an entity.
-
The XFGetCellVolatile function was used to retrieve specific data from OneStream and update the Excel chart once the data is refreshed. Excel requires a volatile function for proper refreshing when using charts that reference calculated cells. This XFGetCellVolatile formula derives from the |!GetCellEntity!| prameter and display updated data when selecting an entity at run-time.
NOTE: See Retrieve Functions in the Excel Add-In for more details.
-
The IF Excel function was also used which derives from the XFGetCellVolatile function. This data updates when the spreadsheet launches from OneStream and the data refreshes. An example of the IF formula is as follows:
=IF((F6=0),"", (D6-F6)/F6)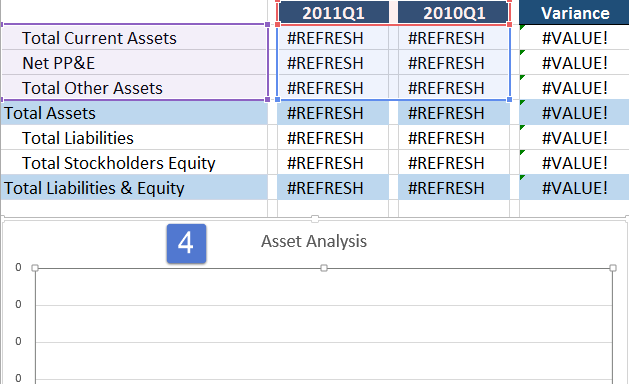
-
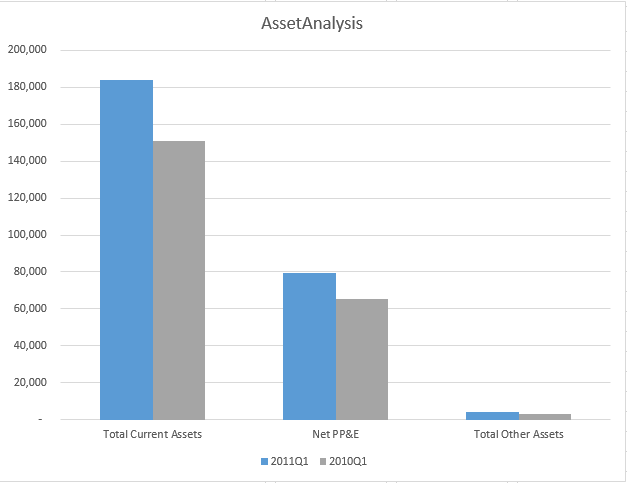
An Excel chart inserted into this spreadsheet is driven by the data. The chart display the correct values whenever it is refreahed.
When the document processes, it prompts to select an entity and then runs the Excel spreadsheet. Log into the Excel Add-In and click Refresh Datato see updated values.
Presenting Data With Extensible Documents › Extensible Document Framework
You can use extensible documents throughout OneStream. Each extensible document file is stored in the file share and can be kept private for specific users or placed into public folders for other users to see and use.
Extensible Documents in Report Books
Add extensible documents to report books by selecting a File Book item and assigning the extensible document file.

The following shows the assignment result:
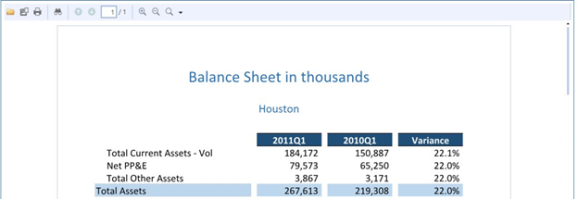
You must have access to the extensible document to run this book or the file displays blank pages. See Presenting Data Using Report Books in Presentation for more details on this feature.
Extensible Documents in Dashboards
View extensible documents in dashboards by assigning them to a File Viewer dashboard component that opens and processes the extensible document at run-time. You can also view extensible documents when assigned to a book that is assigned to a Book Viewer dashboard component. See Dashboards in Presenting Data With Books, Cube Views and Dashboards for more details on dashboard components.
NOTE: If a book contains an extensible Excel document using the XFGetCell function, you do not need to login to the Add-In to see updated values.
Extensible Documents in Data Management
Run extensible documents using a data management sequence by selecting the Export File step type and assigning the specific extensible document file to it. The extensible document exports to the OneStream file share when this step processes. See Data Management in Application Tools for more details on this feature.
Presenting Data With Extensible Documents › Extensible Document Framework › Using Extensible Documents in OneStream
Extensible documents are powerful, but there are some limitations when using different file types. Extensible documents cannot reference themselves.
Text File Limitations
-
Does not support images.
Microsoft Word Limitations
-
Word charts cannot be converted to PDF.
Microsoft PowerPoint Limitations
-
PowerPoint cannot be converted to PDF.
-
When using the Rich Text box component with any Extensible Document or Dashboards, the following display format properties will be ignored in OneStream application and Modern Browser Experience:
-
FontFamily
-
FontSize
-
Bold
-
Italic
-
TextColor
-
BackgroundColor
-
BorderColor
-
-
You can still process and open an Extensible PowerPoint Document that contains an Alt Text - Document Variable with MeasurementUnit, PageWidth, and PageHeight settings that are equal to < 1 inch.
-
The out-of-range settings will automatically be converted to the minimum values equivalent to MeasurementUnit=Inch, PageWidth=1, and PageHeight=1. This includes:
-
When MeasurementUnit=Document and PageWidth < 300 or PageHeight < 300.
-
When MeasurementUnit=Centimeter and PageWidth < 2.54 or PageHeight < 2.54.
-
When MeasurementUnit=Inch and PageWidth < 1 or PageHeight < 1.
-
When MeasurementUnit=Millimeter and PageWidth < 25.4 or PageHeight < 25.4.
-
When MeasurementUnit=Point and PageWidth < 72 or PageHeight < 72.
NOTE: You can process and open an Extensible PowerPoint Document that contains a measurement equal to an integer (for example, MeasurementUnit=123). The integer will be treated as an invalid value, such as MeasurementUnit=invalid, and be automatically converted to the default Inch setting.
-
Microsoft Excel Limitations
-
You can only have 500 or less rows and 50 or less columns. If you include an Argument for an Excel Sheet or Excel Named Range that exceeds the maximum limit, you will receive an error message when attempting to process.
-
The center across columns function is not supported.
-
Excel Spark lines is not supported.
-
Word wrap is not supported.
-
3D charts are not supported.
-
Modifications to colors of individual chart items in a series does not carry through to a PDF.
-
Fitting columns to a page is not supported.
-
Repeating columns and rows is not supported.
-
Cell comments do not display on a PDF after processing.
-
Background images do not display after processing in Excel or PDF.
-
Shapes do not display after processing in Excel or PDF.
-
Smart Art does not display after processing in Excel or PDF.
-
Macros are not supported.
The following Excel functions are not supported in extensible documents.
-
ACCRINT
-
ACCRINTM
-
AGGREGATE
-
AMORDEGRC
-
AMORLINC
-
BAHTTEXT
-
BETA.DIST
-
BETA.INV
-
BINOM.DIST
-
BINOM.DIST.RANGE
-
BINOM.INV
-
BINOMDIST
-
CHISQ.DIST
-
CHISQ.DIST.RT
-
CHISQ.INV
-
CHISQ.INV.RT
-
CHISQ.TEST
-
CONFIDENCE.T
-
COUPDAYBS
-
COUPDAYS
-
COUPDAYSNC
-
COUPNCD
-
COUPNUM
-
COUPPCD
-
COVARIANCE.P
-
COVARIANCE.S
-
CRITBINOM
-
CUBEKIPIMEMBER
-
CUBEMEMBER
-
CUBEMEMBERPROPERTY
-
CUBERANKEDMEMBER
-
CUBESET
-
CUBESETCOUNT
-
CUBEVALUE
-
DDB
-
DEVSQ
-
DISC
-
DURATION
-
EXPON.DIST
-
EXPONDIST
-
F.DIST
-
F.DIST.RT
-
F.INV
-
F.INV.RT
-
F.TEST
-
FACTDOUBLE
-
FILTERXML
-
FISHER
-
FISHERINV
-
FORECAST
-
FVSCHEDULE
-
GAMMA
-
GAMMA.DIST
-
GAMMA.INV
-
GAUSS
-
GCD
-
GETPIVOTDATA
-
GROWTH
-
HARMEAN
-
HYPGEOM.DIST
-
HYPGEOMDIST
-
INTRATE
-
ISPMT
-
KURT
-
LCM
-
LIMEST
-
LOGEST
-
MDURATION
-
MULTINOMINAL
-
NEGBINOM.DIST
-
NEGBINOMDIST
-
ODDFPRICE
-
OFFFYIELD
-
ODDLPRICE
-
ODDLYIELD
-
PERCENTILE.EXC
-
PERCENTILE.ING
-
PERCENTILERANK.EXC
-
PERCENTILERANK.INC
-
PERMUT
-
PERMUTATIONA
-
PHI
-
POISSON
-
POISSON.DIST
-
PRICE
-
PRICEDISC
-
PRICEMAT
-
PROB
-
QUARTILE.EXC
-
QUARTILE.INC
-
RANK.AVG
-
RANK.EQ
-
RECEIVED
-
ROMAN
-
RSQ
-
RTD
-
SERIESSUM
-
SKEW.P
-
SLN
-
STANDARDIZE
-
STDEVPA
-
STEYK
-
SYN
-
T.DIST
-
T.DIST.2T
-
T.DIST.RT
-
T.INV
-
T.INV.2T
-
T.TEST
-
TBILLEQ
-
TBILLPRICE
-
TBILLYIELD
-
TREND
-
TRIMMEAN
-
UNICHAR
-
VARA
-
VARPA
-
VDB
-
WEBSERVICE
-
WEIBULL
-
WEIBULL.DIST
-
XIRR
-
YIELD
-
YIELDDISC
-
YIELDMAT
-
Z.TEST
-
ZTEST